Data Reports
Data Reports differ from Analytical Reports in their purpose and presentation:
- Analytical Reports: Provide insights into data, highlighting key trends and important business aspects to help users make informed decisions.
- Data Reports: Present raw data that users can explore directly within the system or export for further analysis in other software.
Data reports allow users to work with unprocessed information, enabling custom analysis based on specific needs.
Filters Side Window
When a report is opened, the Filters side window opens automatically. Once the report is loaded by clicking the View Report button, the window closes automatically. If you need to modify filters after loading the report, you can reopen the Filters side window using one of the following methods:
- Click on the Filter Display Text in the middle of the top bar.
- Click on the Filter Icon located on the far right side of the top bar, as shown in the image below.

Filtering Data in a Data Report
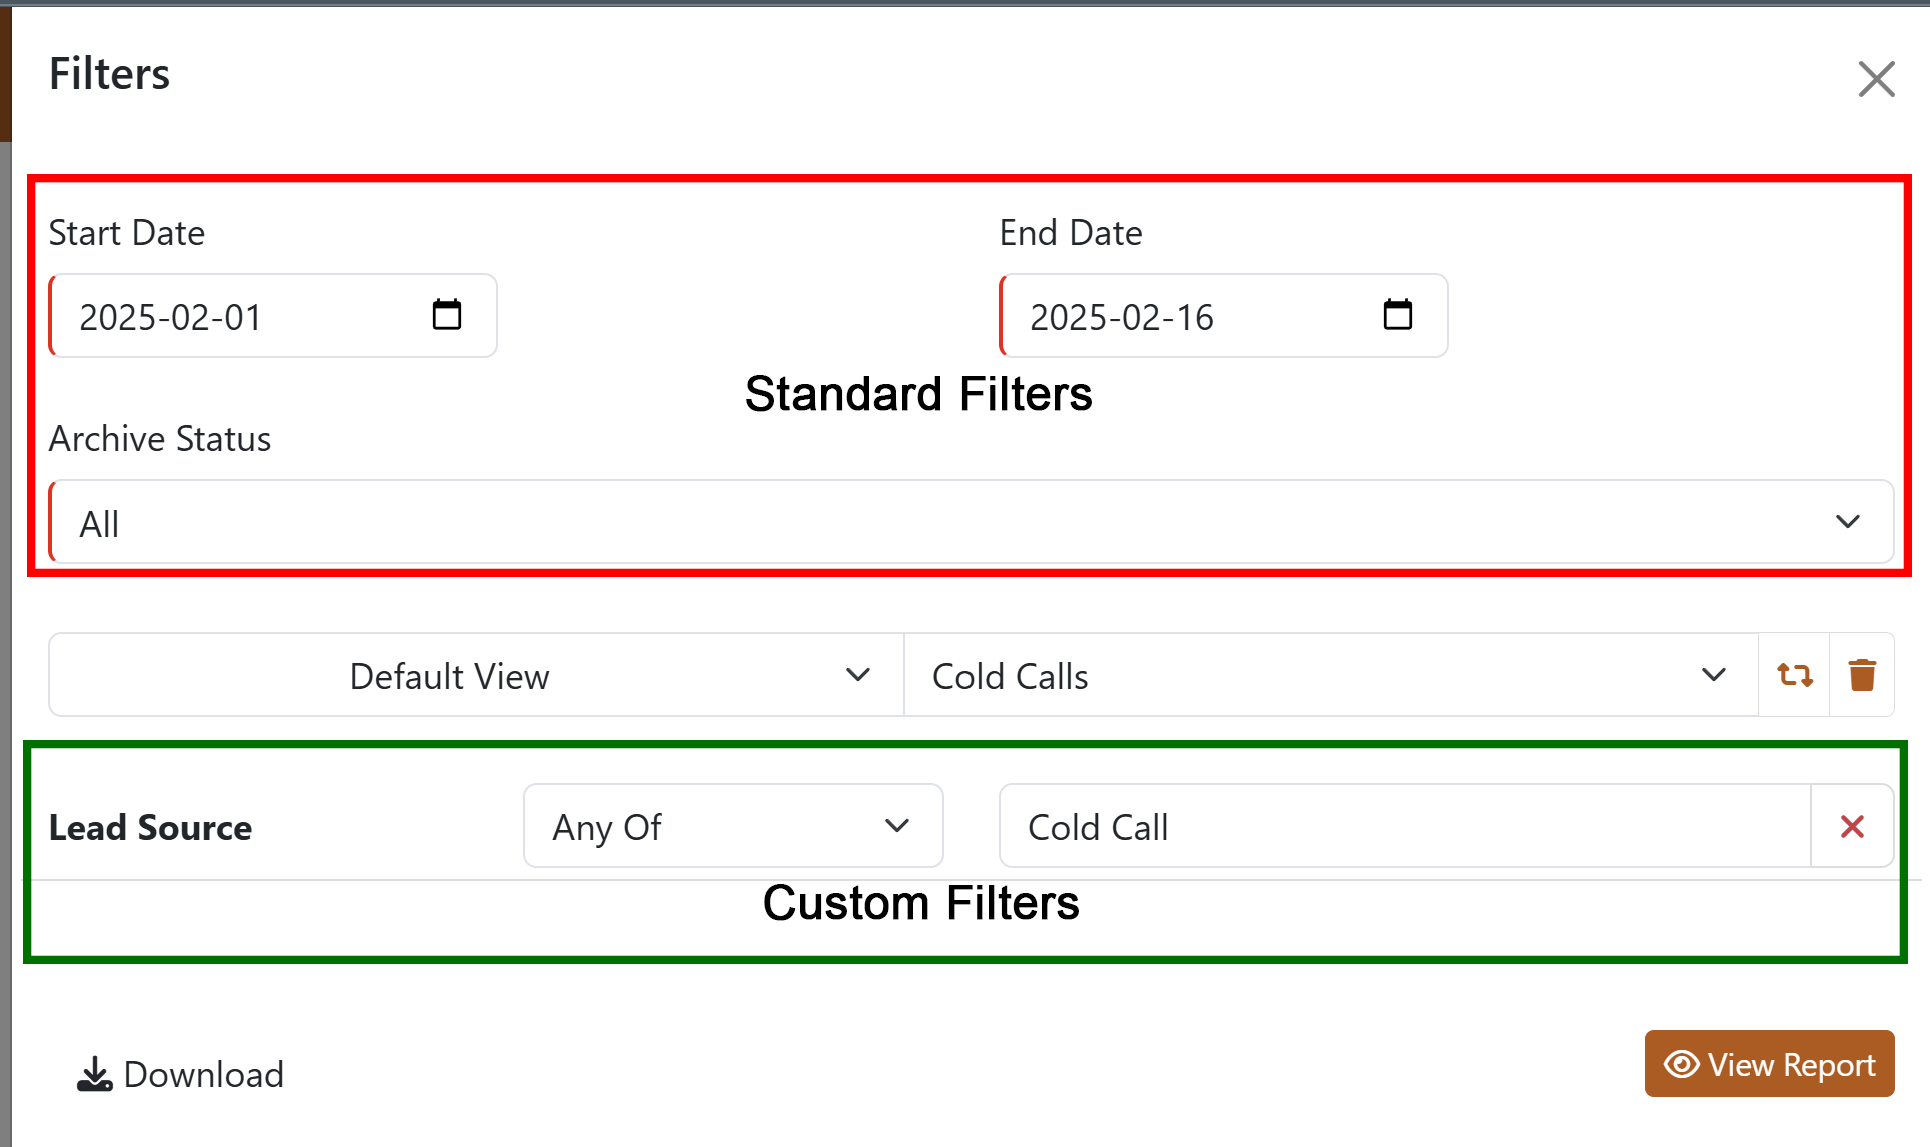
All data reports provide following two types of filters to refine and customize the displayed data.
System Filters
- These filters are mandatory for the report to load.
- They appear at the upper part of the filter window.
- In the image below, filters inside the red rectangle represent system filters.
Custom Filters
- These filters are created by the user to analyze data based on specific needs.
- In the image below, filters inside the green rectangle represent custom filters.
Creating Custom Filters
Do following steps to create custom filters:
- Load the report with standard filters first.
- Hover the mouse over the report. You will see three icons on every cell in the report, as shown in this image:

- Click on the desired icon. Refer the following section to understand how these icons work.
Understanding the Three Filter Icons
- Multi-Value Filter: The first box allows filtering data in a column based on multiple values.
- For example, to filter leads interested in Audi A3 and Audi A5, hover over Audi A3, click the first box to check it, then hover over Audi A5 and click the first box again.
- Click on the last filter icon to filter data where leads were interested in both Audi A3 and Audi A5.
- Edit Filter Value: The second icon allows adding or editing a filter value before applying it.
- Clicking this icon adds a filter to the custom filter section and opens the filters panel.
- You can change the filter value and click on the View Report button.
- Alternatively, click on the Download Report button to download the report directly without loading it in the UI.
- Instant Filter: The third button applies the filter instantly based on the previously selected values and the value of its parent cell.
- If you want to instantly filter leads interested in Audi A3, hover over the cell containing Audi A3 and click the instant filter icon.
- The report will reload, showing only leads interested in Audi A3.
Comparing Values
Custom filters allow users to compare values based on specific requirements. Every applied filter consists of three sections:
- Field Name: The field where the filter will be applied.
- Comparison Method: Defines how values will be compared.
- Values: The actual data to compare against. Please see following image for reference:
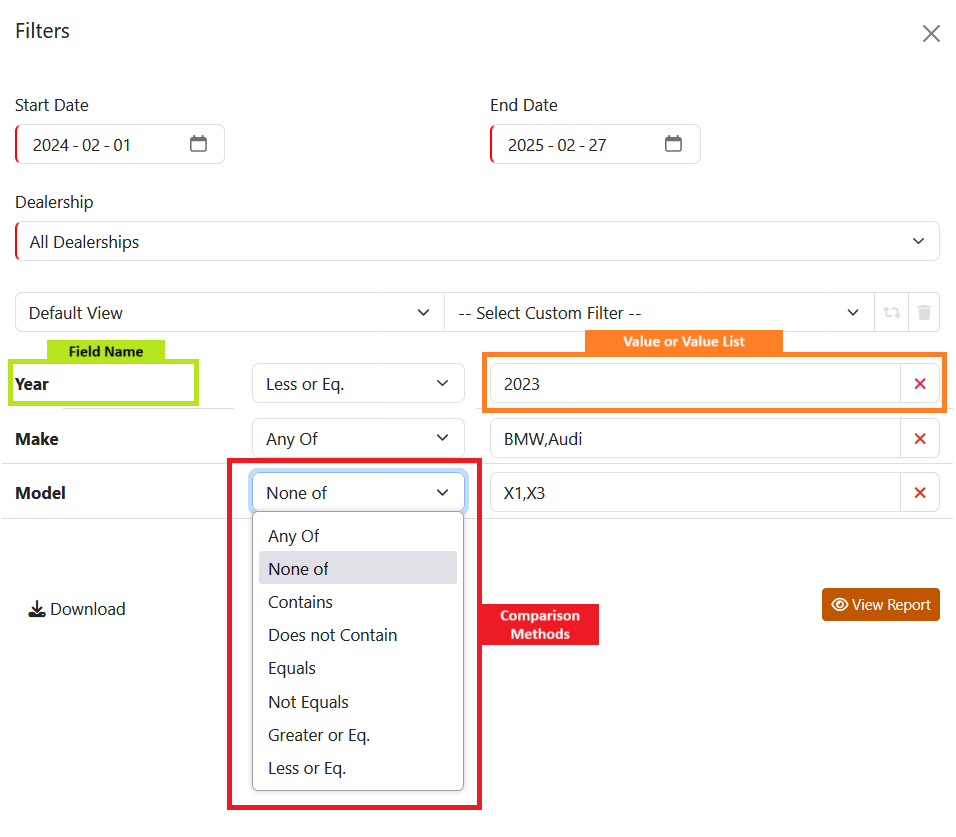
The Comparison Method list provides various options to tweak filter behavior. Below are the available methods:
- Any Of: Filters data where any value in the comma-separated list matches.
Example: To filter vehicles where the make is either Audi, BMW, or Toyota, select "Any Of" and enterAudi,BMW,Toyota(without spaces) in the value field. - None Of: Filters data where none of the values in the list match.
Example: To exclude Audi, BMW, and Toyota from the list, select "None Of" and enterAudi,BMW,Toyotain the value field. - Contains: Filters records where the specified value is present within the field.
Example: To filter vehicles where the Description contains "Automatic," select "Contains" and enterAutomatic.
Note: This method does not support multiple values (e.g., "Automatic,Manual"). - Does Not Contain: Opposite of "Contains." Filters data where the specified value does not appear anywhere in the field.
- Equals: Filters data where the field value exactly matches the provided value.
- Not Equals: Filters data where the field value does not match the provided value.
- Greater or Eq.: Used for numeric fields to filter values greater than or equal to a specified number.
Example: To filter vehicles where the selling price is at least 100,000, select "Greater or Eq." and enter100000. - Less or Eq.: Similar to "Greater or Eq.," but filters values less than or equal to the specified number.
Saving and Reusing Custom Filters
There are cases when you may need to apply the same filter repeatedly. For example, if there are frequent queries to list vehicles where the make is Audi and the price is under 200,000, you can save this filter and apply it on demand.
Steps to Save a Filter
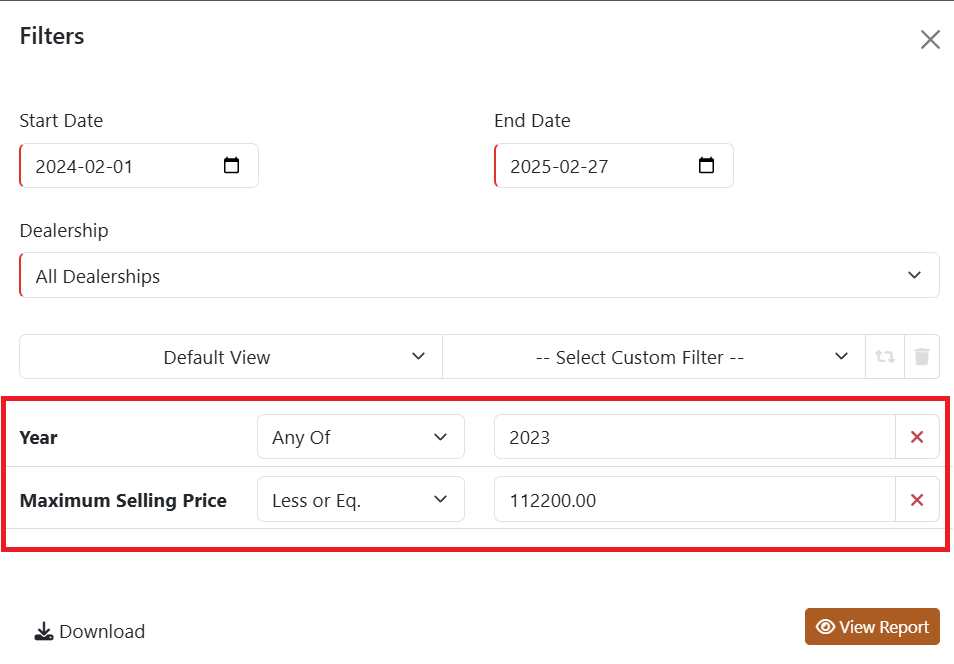
- As you create custom filters, they appear in the Filters side window. Refer to this section to know how to open filters side window.
- In the following image, the red rectangle highlights the filters that were applied.
- Click on the "--Select Custom Filter--" dropdown list and select "Save Current Filter As" as shown in the following image.
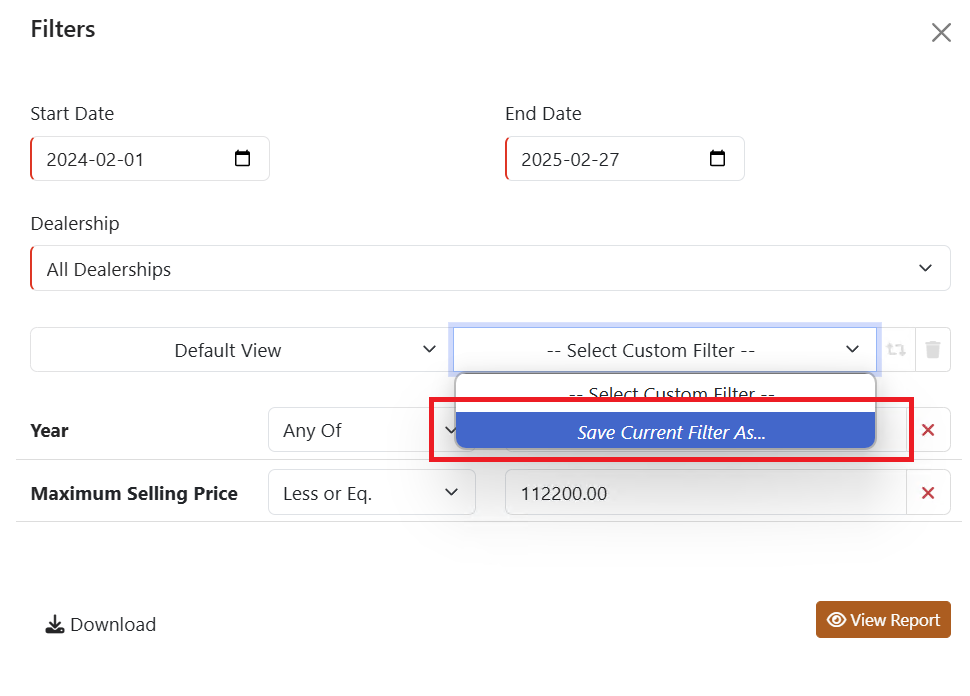
- A small window will appear asking for a filter name. Type the filter name and click Save.
Your saved filter will now appear in the "--Select Custom Filter--" list. The next time you open a report, simply select your saved filter from the list to apply it instantly.
Use Case: Creating and Saving Filters
You can create and save filters as needed for quick access. Below is an example use case:
Example Scenarios:
- Filtering Leads by Interest: You may need to filter leads who were interested in a specific vehicle model. For example:
- Filter leads interested in Audi A5 and save it as "Audi A5 Leads".
- Filter leads interested in Toyota Camry and save it as "Toyota Camry Leads".
- Quick Access to Saved Filters: Whenever an Audi A5 arrives in stock, simply select "Audi A5 Leads" from the filter list and load the report. This ensures you can quickly identify potential buyers and follow up accordingly.
Removing Filters
You can remove a filter using the following methods:
- Red Cross Icon: Click on the red cross (✖) icon at the end of each filter row to remove a specific filter.
- Remove Filter Icon in Column Heading: Every column that is used in filters displays a "Remove Filter" icon. Click on this icon in the column heading to remove the applied filter for that column.
Custom Views
Custom Views allow you to create a report with only the columns you need, making data analysis more efficient.
Why should you use Custom Views?
- Default reports contain numerous columns that may not always be necessary.
- For example, if you need a list of leads with only Lead Name and Contact Number, a Custom View can help remove unwanted columns.
- If you need a report by Lead Owner, you can create a view that includes Lead Name, Lead Owner, Vehicle Interested In, Phone Number, Address, and Date of Birth.
- Using different views saves time and allows easy application of custom filters.
Steps to Create a Custom View:
- Load the report first (Custom Views cannot be created until a report is loaded).
- Click on the Views List button as shown in the following image.
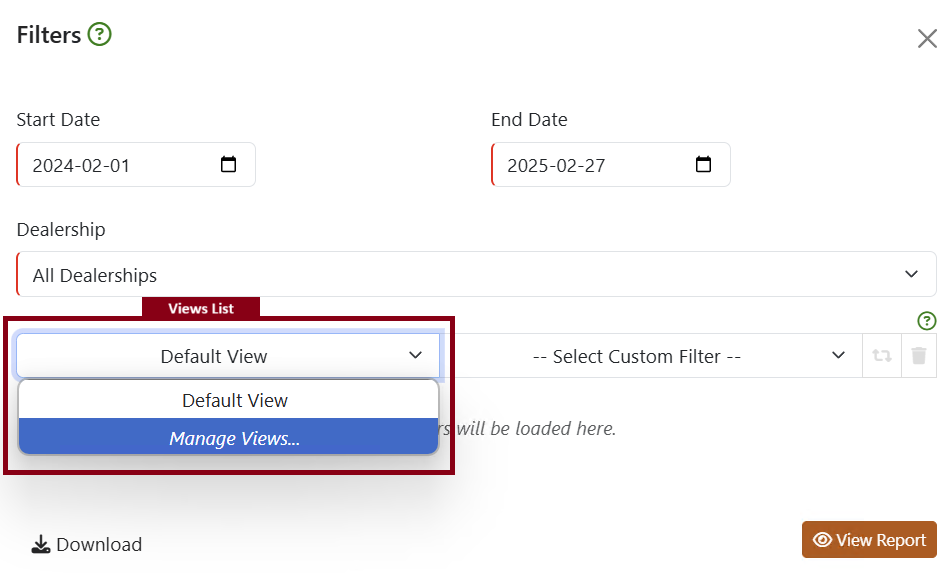
- This will open the Manage Views window as shown in the following image.
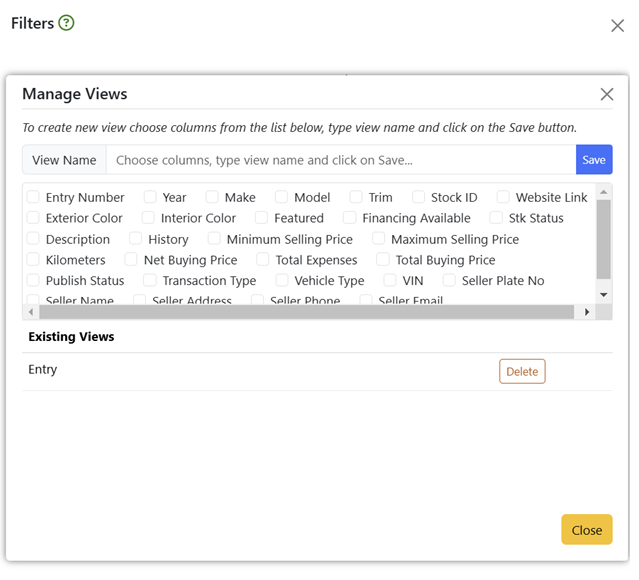
- Enter a name for your view in the View Name field.
- Select the columns you want to include in your report.
- Click Save.
Using a Custom View
Once saved, the new view will appear in the Views List. To use a saved view, open the View List, select the view, and load the report.
Modifying or Deleting a Custom View
- Open the Manage Views window.
- In the Existing Views section, find your saved view.
- To delete a view, click on the Delete button.
- To modify a view, click on the view name. The settings will appear in the upper pane where the view was created.