Marketing
The Marketing module includes all tools to manage your digital marketing activities. It is available to all admins and to authorized standard users.
Live Chat
Documentation is coming soon.
Bella AI Chat Agent
Bella AI Chat Agent is an intelligent, conversational sales assistant designed specifically for dealership websites. Her primary purpose is to engage website visitors, assist them in finding the right vehicles, answer their questions, present relevant offers, and guide high-intent users into your CRM as qualified leads.
Bella transforms your website from a passive listing platform into an active, real-time sales environment that works continuously to generate opportunities for your dealership.
How Bella AI Chat Bot Works
Bella continuously monitors visitor behavior on your website, such as pages viewed, time spent, and interactions. Based on this activity, the system calculates a buying intent score behind the scenes. When a visitor shows meaningful interest, Bella can proactively engage them with a helpful message or respond instantly when the user initiates a chat.
During the conversation, Bella understands customer needs, asks relevant follow-up questions, recommends vehicles from your inventory, and gradually collects contact information in a natural, non-intrusive way.
Key Features and Capabilities
- Conversational Inventory Search: Bella can search your live inventory, find matching or similar vehicles, and provide detailed specifications instantly.
- Smart Lead Generation: Bella collects customer details naturally by offering value such as reports, pricing details, or availability updates.
- Real-Time Intent Tracking: The system assigns a dynamic intent score from 1 to 5 based on visitor behavior and engagement.
- Dynamic Web Offers: Bella presents personalized offers and coupon codes based on user intent and vehicle interest.
- Live Agent Handover: Conversations can be seamlessly transferred to a human agent when required.
- CRM Integration: Leads are automatically created or updated in Dealersip with conversation summaries.
Interacting with Bella
Visitors can start a conversation by clicking the chat icon available on your website. Bella greets the user with a welcome message and is ready to respond to natural language queries such as:
- Do you have any SUVs under a specific budget?
- What offers are currently available?
- Can I book a test drive?
Bella responds instantly, keeps the conversation flowing, and guides users toward meaningful actions.
AI Nudge and Proactive Engagement
Bella can proactively engage visitors using an AI Nudge when the system detects moderate to high buying intent. This ensures that serious buyers are engaged at the right time instead of waiting for them to initiate contact.
The nudge appears as a friendly prompt encouraging the visitor to start a conversation, improving engagement and conversion rates.
Lead Collection Strategy
Bella follows a structured conversational sales approach:
- Building Rapport: Initial questions are answered without asking for contact details.
- Value Exchange: Bella offers useful information such as reports, pricing, or availability in exchange for contact details.
- Action-Based Capture: For test drives, financing, or callbacks, Bella ensures that name and phone number are collected before proceeding.
Once the required information is collected, Bella immediately saves the data and creates or updates the lead in the CRM system.
Lead Creation and CRM Integration
When sufficient information is available, Bella automatically creates a lead in Dealersip. Each lead includes:
- Customer contact details
- Interested vehicle information
- Conversation summary
- Intent level and request type
If a lead already exists, Bella updates the existing record instead of creating duplicates.
Understanding Intent-Based Offers
Bella uses the intent tracking system to display dynamic web offers tailored to each visitor.
When Offers Are Shown
- Reactive: When a user asks about discounts, deals, or promotions.
- Proactive: When the system detects a high intent score, Bella may present an offer automatically.
Types of Offers
- Vehicle-Specific Offers: Targeted offers based on the exact vehicle the user is viewing.
- Dealership-Wide Offers: General promotions shown when no specific vehicle is selected.
These offers may include special pricing, limited-time deals, or coupon codes designed to encourage conversions.
Live Agent Handover
If a visitor requests to speak with a human agent, Bella checks for available team members.
- If an agent is available, the chat is immediately transferred.
- If no agents are online, Bella informs the visitor and collects contact details for a callback.
Once handed over, Bella stops responding and allows your team to take control of the conversation.
Email Notifications
Dealersip sends notifications when Bella creates or updates a lead:
- New leads trigger immediate email notifications.
- Lead updates may be sent when the chat session ends.
- Test drive and financing requests are treated as high-priority notifications.
Customize Bella AI
You can customize Bella AI from:
Setup → AiSettings
- Agent Name: Set the name displayed during chat.
- Welcome Message: Define the greeting shown to visitors.
- Nudge Text: Customize the proactive message shown to engage visitors.
Best Practices
- Use a friendly and professional agent name
- Keep welcome and nudge messages short and helpful
- Ensure inventory is updated regularly for accurate recommendations
- Respond quickly when chats are handed over to live agents
- Follow up on leads promptly to maximize conversions
Troubleshooting and Security
Bella runs on a secure backend and includes built-in protection against spam and misuse. Rapid or suspicious inputs may be temporarily limited to maintain system performance and ensure accurate intent tracking.
The system is designed to operate efficiently without impacting website performance, as tracking and engagement logic run in an optimized and controlled manner.
Important Notes
Bella AI is designed to support your sales process, not replace it. It helps capture more opportunities by engaging visitors at the right time and guiding them toward meaningful actions.
Bella AI Chat Agent is available free for 6 months for all existing Dealersip users.
Promotions
Promotions Module
The Promotions Module allows you to manage your dealership promotions across multiple platforms such as Facebook, Google Business Profile, and Google Ads.
To access the Promotions module, expand the Marketing section in the sidebar and click on the Promotions link.
Create or Edit a Promotion
Create Promotions
To create a new promotion, expand the Marketing section in the sidebar and click on the Promotions link. On the resulting page, click the Create New button located on the top-right corner of the header bar. This will open the Create Promotion window.
Facebook Tab
This tab allows you to schedule and publish a promotion post on your Facebook Page. To enable publishing, check the Publish on Facebook Page checkbox. You can schedule the post for a future date and time using the Publish On field.
You must select at least one photo to proceed. You can either select photos manually or click Select All to choose all available photos. The same selected photos will be used for Google Business Profile as well.
In the Facebook Post Content box, you can write your own post content or click the Create with AI link. When selected, the system will automatically search for vehicle specifications online and generate relevant and engaging content.
Google Business Tab
This tab behaves just like the Facebook tab. You can enable the Publish on Business Page option and set a scheduled time for the post. The same photo selection applies to both Facebook and Google Business Profile. You can write a different content for Google Business Profile post. If you choose to use AI, it will generate content suited for your Google post as well.
Google Ads Tab
The Google Ads section lets you create an ad campaign for your vehicle. To enable, check the Create Google Ad checkbox. Set a Start Date and an End Date along with the Budget amount.
Unlike Facebook or Google Business posts, Google Ads do not use your selected photos. The system automatically selects the most appropriate image to generate the highest user engagement.
Important Notes
- The Facebook and Google Business tabs only display settings if the respective accounts are connected in the Integrations section.
- If not connected, a link is shown instead of settings. Clicking this link will redirect you to the Integrations page to complete the connection.
To create a new promotion, follow these steps:
- Expand the Marketing section in the sidebar.
- Click on the Promotions link to open the promotions page.
- On the top right side of the header bar, click the Create New button.
To edit existing promotion, follow these steps:
- Find promotion from the Manage Promotions list.
- Click on the Pencil/Edit icon,
- This will open the promotion in Edit mode.
Please note that when a promotion is edited then it is modified in real time on all associated platforms.
Vehicle
Use blue link to select the vehicle that you want to create promotion for. This link opens search window. Search the vehicle in search window and click on Select link. Posts will be created on all selected platforms for the selected vehicle.
Please note that "Select" link in search window is visible only for those vehicles that are in stock. Sold vehicles cannot be selected for promotions.
The Facebook tab allows you to publish your promotion directly to your connected Facebook Page.
Publish on Facebook Page
To create a Facebook post, check the 'Publish on Facebook Page' box. Once the post is created, this checkbox becomes disabled. You can still edit the content of the post, but you cannot uncheck the box unless the post is deleted. Deleting the post will re-enable the checkbox."
Publish On Date
The Facebook post is published on the selected Publish On date and time.
- The selected time must not be more than 15 minutes in the past.
- If a time older than 15 minutes is selected, the post will not be published.
- You can schedule the post for any future date and time.
Facebook Post Content
The Facebook Post Content serves as the engaging description for your social media posts. You can use AI to craft highlights of unique features of your vehicle to captivate the audience’s interest.
You can click on the Create with AI button to generate highly optimized content for your promotions. The AI is used once to create social media content for each vehicle.
How It Works
- Once the Create with AI button is clicked, the system generates content and attaches it to the vehicle.
- If you use AI again for the same vehicle, the system will return the previously generated content instead of creating new content. For more details on how AI is used, please refer to this section.
Note: Before you hit "Create with AI" link, make sure that you have entered all details for the vehicle in Purchase page.
Google Business Profile
Publish on Business Page
To create a post on Google Business Profile, check the 'Publish on Business Page' box. Once the post is created, this checkbox becomes disabled. You can still edit the content of the post, but you cannot uncheck the box unless the post is deleted. Deleting the post will re-enable the checkbox."
Publish On Date
The post is published on the selected Publish On date and time.
- The selected time must not be more than 15 minutes in the past.
- If a time older than 15 minutes is selected, the post will not be published.
- You can schedule the post for any future date and time.
Google Business Page Post Content
The Google Business Page Post Content serves as the engaging description for your Google Business post. You can use AI to highlight the unique features of your vehicle and attract potential customers.
Click on the Create with AI button to generate highly optimized content for your promotion. The AI is used once to create post content for each vehicle.
How It Works
- When you click the Create with AI button, the system generates content and attaches it to the selected vehicle.
- If you use the AI again for the same vehicle, the system will return the previously generated content instead of creating new text.
- For more information about how AI is used, please refer to this section of the manual.
Note: Before clicking the Create with AI button, ensure all vehicle details are entered correctly on the Purchase page.
Google Ads
The Google Ads section contains settings for creating a Google Ad. Once a promotion where a campaign includes Google Ads is published, some settings, such as the start date, end date, and budget, can no longer be edited.
Create Google Ad
To create a Google Ad, check the 'Create Google Ad' box. Once the ad is created, this checkbox becomes disabled. You can still edit the ad’s start date, end date, and budget, but you cannot uncheck the box unless the ad is deleted. Deleting the ad will re-enable the checkbox.
Start and End Dates
The Google Ad is created instantly when the Save button is pressed. But the ad will run only between the specified Start Date and End Date, or until the budget is exhausted, whichever comes first. Once created, the ad cannot be modified even if the entire promotion is deleted.
Budget
The budget field defines how much you want to spend on a paid promotion. The value you set in this field spans the promotion's lifetime. For example, if your promotion runs for five days, the system will spend the amount you specify over those five days, adjusting the daily spend automatically. There is no minimum budget setting, but a higher budget is recommended if competition in your area is high.
Note: You cannot edit the budget if a promotion is live.
Photos
The Photos section displays all uploaded images of the selected vehicle.
- You can select specific images or use the Select All checkbox to choose all photos at once.
- Once a promotion is scheduled or published, the selected photos cannot be changed.
- To modify the photos, you must delete the promotion and create a new one.
Promote Website
This module is not available in your country. We are launching it soon globally.
Google Reviews
Google Reviews brings the reviews from your Google Business Profile into Dealersip, so your team reads and answers them in the same place they work all day. From this one tab you can:
- read every review your business has received, with the star rating and the reviewer’s name and photo;
- reply to a review, edit that reply, or delete it — the reply is posted straight to your Google Business page;
- have the software write the reply for you with Write with AI;
- pick which reviews appear on your website;
- share a ready-made review link and a printable QR code, and let every sale ask the buyer for a review by itself.
Before any of this works, your Google Business Profile must be connected. That is a one-time setup done under Marketing → Integrations — see Connecting to Business Profile. Until it is connected this tab stays empty.
Reading your reviews
Go to Marketing → Social Inbox. The screen opens on the Google Reviews tab, split in two: the reviews on the left, the review-collection tools on the right.
The rating summary
Above the list sits your overall score: your average rating as a large number with the same rating repeated as stars underneath, the total number of reviews your business has on Google, and a Summary block with one bar per star level, from 5 down to 1, showing how your reviews are spread across the five levels.
Filtering by star rating
Across the top of the list is Filter by: with a checkbox for each rating — 1 Star, 2 Stars, 3 Stars, 4 Stars and 5 Stars.
- Tick one or more boxes to see only those ratings. Ticking 1 Star and 2 Stars together, for example, is the quickest way to find the unhappy customers who still need an answer.
- With nothing ticked, every review is listed.
- If no review matches, the list reads No reviews found!
Reviews are always listed newest first.
What each review shows
Every review is a card with the reviewer’s Google profile photo and their star rating on the left, and on the right:
- the reviewer’s name;
- the review text — when someone rates you without writing anything, the card says This user did not leave any comments. instead;
- the date and time the review was posted, in your dealership’s local time;
- a Visible on Website / Hidden switch;
- a Reply button — or, if you have already answered, your reply, the line Replied by <name> on <date>, and the Edit and Delete buttons.
Where a reply was posted directly on Google rather than through Dealersip, the replier is shown as Owner.
When the list is empty
A brand-new connection shows No reviews yet, with two possible reasons: the profile was only just connected — click Refresh to fetch the latest data — or your business has not received any reviews yet.
Keeping reviews up to date
Dealersip fetches reviews from Google on its own every two hours, starting as soon as the profile and location are connected. You do not have to do anything to keep the list current.
When a new review arrives, everyone with access to the Social Inbox gets an in-app notification — You got a new review on Google Maps! Click here to respond and make an impression. — and an email titled You’ve Got a New Review! with a link to the Social Inbox. Anyone with the screen already open sees the list refresh by itself.
Refreshing by hand
To pull reviews immediately rather than wait for the next two-hourly run, click Refresh in the toolbar at the top right of the Social Inbox screen. The software answers Hang tight! Your refresh request is being processed. — the fetch runs in the background, so give it a moment and then reload the list.
You can ask Google for an update once every 15 minutes. Click Refresh again too soon and you get Reviews were last refreshed at 10:42 AM. You can request an update from Google once every 15 minutes.
Each sync also picks up replies you posted on Google itself, so the two stay in step.
Replying to a review
A reply posted here goes straight onto your Google Business page under that review, where the public can see it.
- Find the review and click Reply at the bottom right of its card. A reply box opens inside the card.
- Type your reply in the Reply box.
- Click Save.
The reply is posted to Google and the card redraws to show it, along with Replied by <your name> on <date>. The confirmation reads Review reply has been successfully posted.
Points to know:
- The reply cannot be blank — the software stops you with Reply cannot be empty.
- Cancel closes the reply box and throws away what you typed. Nothing is sent to Google.
- Only one reply box is open at a time. Open a reply on a second review and the first box closes on its own, taking anything you had typed there with it. Finish and save one reply before starting the next.
Editing a reply
Click Edit on a review you have already answered, change the text, and click Save. Google keeps one reply per review, so saving again replaces what was there.
Deleting a reply
Click Delete on the reply. The software asks This reply will be permanently deleted from Google business page and from Dealersip. Do you want to continue? Click OK and the reply is removed from your Google page as well as from Dealersip. The card goes back to showing a Reply button.
If something goes wrong
Because the reply travels to Google, two things can fail independently:
- Error occurred while updating reply on Google business page. — Google refused the reply and nothing changed. Try again.
- This reply has been updated on Google but was not updated in Dealersip. Please create a support request for this. — the public reply went through, but Dealersip’s copy did not update, so the card may look wrong until the next sync. Raise a support request with the error code shown.
Write with AI
Rather than composing every reply yourself, let the software draft it.
- Open the reply box on a review (Reply, or Edit on a review you have already answered).
- Click Write with AI, the blue link at the top right of the Reply box.
- The software shows Please wait, this may take a minute or two... while it writes.
- The suggested reply appears in the Reply box.
- Read it, edit it to sound like your dealership, then click Save. Nothing is sent to Google until you press Save.
What the suggestion is based on: your dealership’s registered name, the kind of vehicles you sell, the star rating the customer gave, and the comment they left (if any). The result is a single plain-text paragraph with no greeting or sign-off, ready to use as it is.
If the draft cannot be produced you will see Failed to generate reply with AI. Please create a support ticket.
Showing reviews on your website
Every review card carries a switch that reads Hidden or Visible on Website.
- Click the switch to show that review on your website; click it again to take it down. The change saves straight away — there is no separate save button — and the label changes to match.
- New reviews arrive hidden. Nothing is published to your website until someone turns it on, so a poor review never appears on your site by accident.
- Your website shows the 20 most recent reviews you have switched on, newest first.
If the reviews do not appear on your website
Publishing happens through the Google Reviews plug-in on your dealership website. Where the website has that plug-in, the reviews you switch on are published to it; where it does not, nothing appears no matter how many reviews you switch on. If you have switched reviews on and still cannot see them on your site, contact your web developer or your account manager and ask for the Google Reviews plug-in to be set up on your website.
Getting more reviews
The right-hand side of the tab is headed Boost your credibility with more reviews! The first time you open the screen it reads Generating unique Google link to collect reviews... for a moment while the software fetches your link from Google.
Not having enough reviews can hurt your business. Reviews build trust, boost your visibility on Google, and influence new customers.
Your review link
Your unique Google review link is the direct link to your business’s review form on Google — a customer who opens it lands straight on the star-rating box, with nothing to search for.
Click the clipboard icon beside the link to copy it, then paste it into a follow-up SMS, an email signature, an invoice, or a thank-you message after delivery. The software confirms with Copied to Clipboard. If your browser blocks the copy you will see Cannot copy to the clipboard... — select the link text and copy it yourself.
Your QR code
Underneath is a QR code for the same link. Click Download QR Code to save it as an image, then print it and place it around your dealership — the showroom, the waiting area, the service desk, even inside a delivered vehicle. A customer scans it with their phone camera and the review form opens. Every scan counts.
If the link could not be generated you will see Failed generating "Ask for Review" link. — check under Marketing → Integrations that the profile and location are still connected.
Asking every buyer, automatically
Connecting your Google Business Profile also switches on the feedback request that goes out after a sale. Dealersip emails the buyer asking them to review your dealership on Google, and that email carries the same review link — so every vehicle you sell becomes a chance at another review, without anyone having to remember to ask.
You decide this sale by sale, while you are entering it. In the Buyer section of the sale entry screen sits a Feedback Request list with two choices: Send Feedback Request on Save, or Do not send Feedback Request.
Asking for the request does not email the buyer on the spot — it is queued and goes out the next morning, and the sale card on Manage Sales shows a Queued, Review Request Pending or Review Requested badge so you can see at a glance which customers have been asked. You can also send any request immediately from the sale card.
For the full detail — the badges, sending immediately, what has to be in place, and what the customer receives — see Sending Feedback Request to Customer.
Who can see this tab
The Social Inbox is permission-controlled. Administrators always have access; any other user needs to be given access to Social Inbox by an administrator under Admin → Users. The same list decides who receives the new-review notification and email, so someone who should be answering reviews but never hears about them is usually missing this permission.
This section displays comments received on your Facebook posts.
Similar to Google Reviews, you can:
- Reply to comments.
- Manage your replies.
Converting Users to Leads: Click on the Convert to Lead link below the comment text to directly convert users into leads.
Contact Us
The Contact Us tab collects the enquiries visitors send through the Contact Us page on your website, so a website enquiry lands in the same place as your reviews and Facebook comments instead of an inbox somebody forgets to check. Go to Marketing → Social Inbox and open the Contact Us tab, which carries the reminder This section displays enquiries submitted through the Contact Us page on your website.
When someone submits the form, everyone with Social Inbox access is notified in the software and by email, so the enquiry can be answered while the visitor is still interested.
What each enquiry shows
Enquiries are listed newest first. Each one shows the visitor’s name, the date and time they wrote, their phone and email, and their message in full.
An enquiry that has already been turned into a lead carries a green Lead badge beside the name.
Turning an enquiry into a lead
Click Convert to Lead on the right of the enquiry. The lead form opens with the visitor’s details already filled in — name, email, phone, their message as the description, and the lead source set to your website — so you only add what you know and save.
Once saved, the enquiry gains its Lead badge and the button becomes View Lead. Click View Lead at any time to open the lead itself on the Leads screen, which is how you find out which lead came from which enquiry.
When there are no enquiries yet
Until your first submission arrives the tab suggests promoting your website more widely — include the address in your email signatures and marketing campaigns, put a QR code on company vehicles, and place large, visible QR codes at the entrance of your showroom. Consistent promotion brings more visitors to the site, and more of them to this tab.
Integrations
The Integrations module allows you to manage third-party connections that enhance the functionality of your software, such as Facebook, Google Ads, Google Business Profile, and India Mart.
Integration Status Indicators
- Green icon: Integration is successfully connected.
- Red icon: Not connected.
- Orange icon: Connected, but requires additional setup steps.
Managing Integrations
- If a gear icon is visible on a card, you can click it to manage additional settings for that integration.
- Click the trash icon to remove an integration, if needed.
Adding a New Integration
- Click the + Connection button in the top-right corner.
- A side panel will appear showing all available integrations.
- Already connected integrations will be disabled and shown in gray.
- Select any available integration icon to begin the connection process.
- Follow the on-screen instructions to complete the integration.
Connecting with Facebook
To connect to Facebook, click the Connect button. Click on the Facebook icon, and you will be redirected to its official login page. Follow the on-screen instructions to complete the connection. In some cases Facebook may ask you to claim the page. This is normal. Just click on the Claim link.
Information We Store
Facebook uses a secure connection system. Upon successful connection, Facebook issues tokens that grant limited access, including an access-token, page-access-token, and your Facebook page ID. Only these three pieces of information are securely stored in our database. We do not retrieve or store any other details from your Facebook profile.
Disconnecting Facebook
Click  icon to remove the connection and all associated data from our system.
Troubleshooting Facebook Connectivity
Sometimes Dealersip users face problems connecting to Facebook. This usually happens when the user deletes the connection from the Integrations page inside Dealersip, but the apCRM app remains in the Connected Apps section in Meta Business Suite. To resolve this issue, you need to manually remove apCRM from Meta Business Suite.
Steps to Remove apCRM from Meta Business Suit
- Log in to your Facebook account and click on your profile icon in the top-right corner, marked as 1 in the image below. From the dropdown, select the business profile that you are using with apCRM of Dealersip. If you do not see the profile in the drop down then click on "See all Profiles", marked as 2 in the following image.
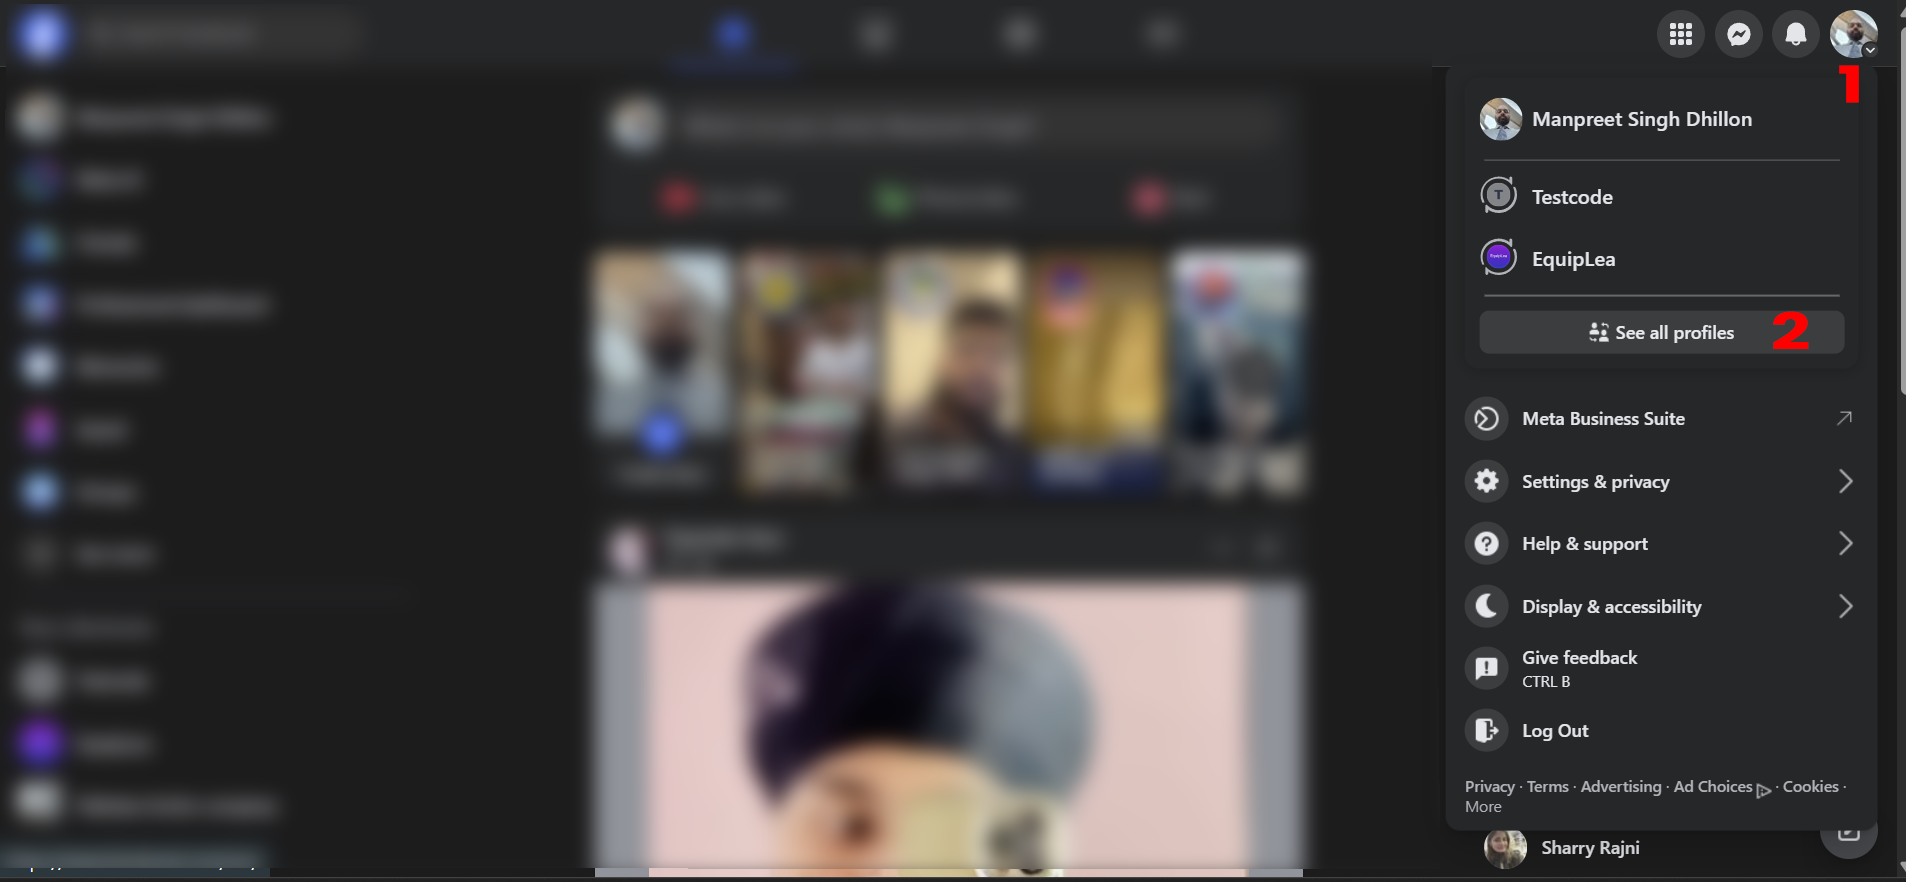
If you chose "See all Profiles", then you will see list of all available profiles as shown below:.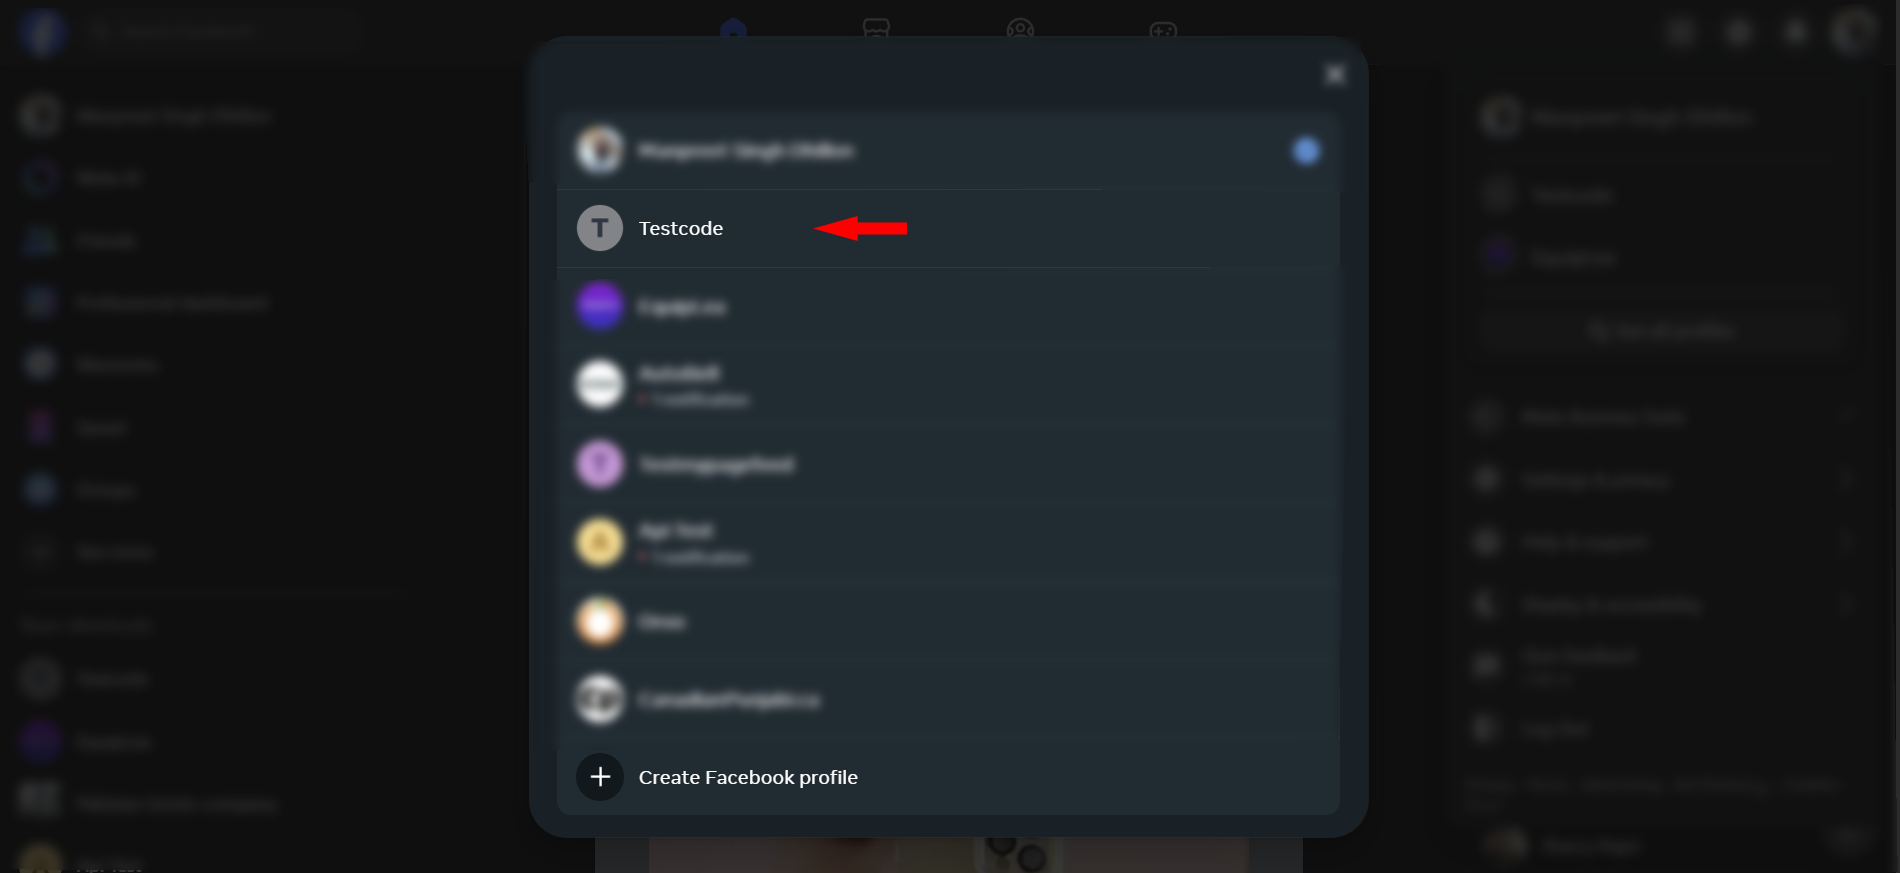
Choose the profile you are using with Dealersip-apCRM and continue with the next steps. - Once you are in the selected profile, in the left side menu, click See more to expand settings.

This will expand settings and will show more settings. Click on Meta Business Suite to open the business settings.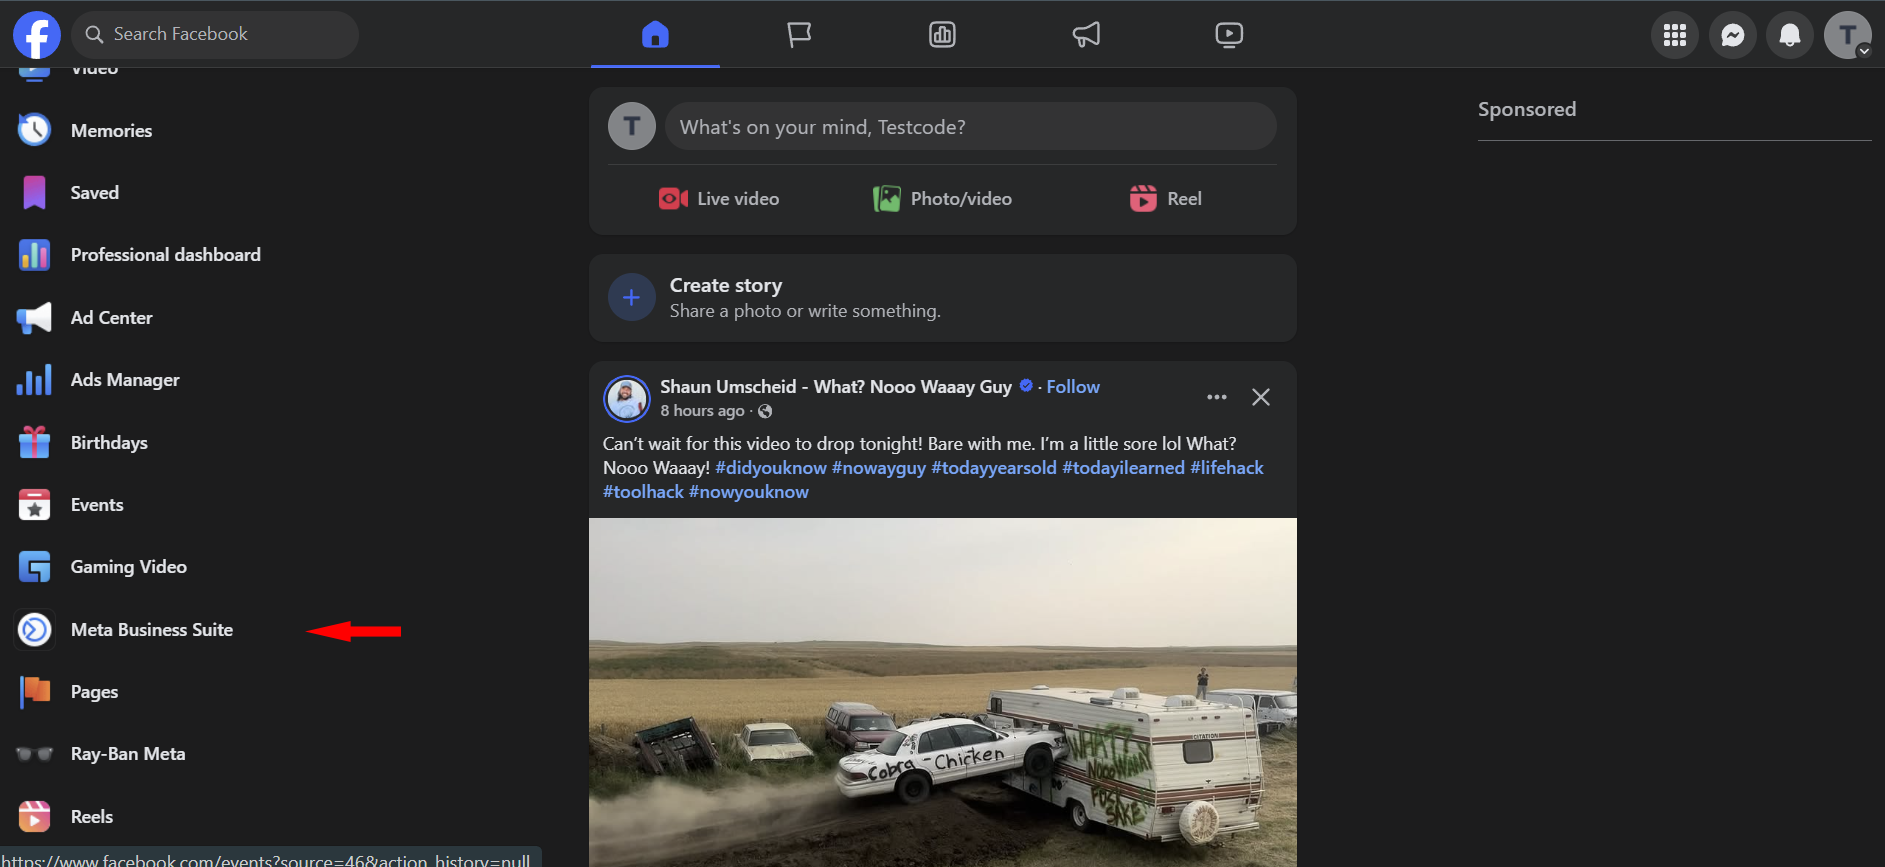
- In Meta Business Suite, go to the bottom left corner and click Settings.
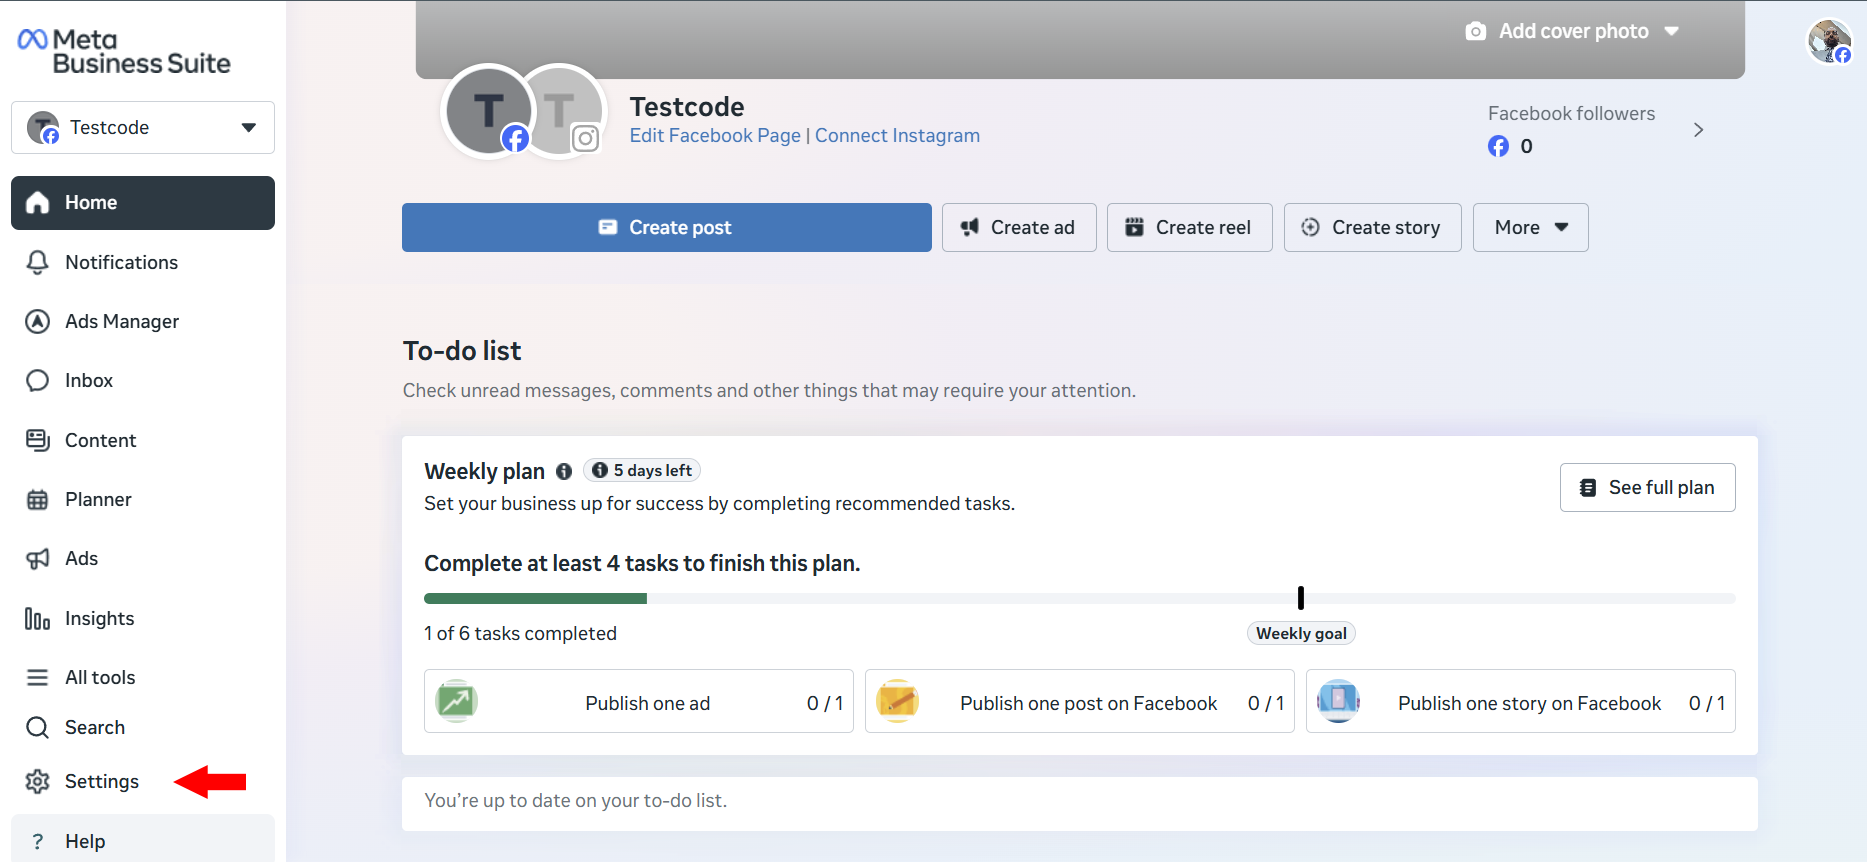
- In the settings panel, expand Integrations and then click on Connected Apps.
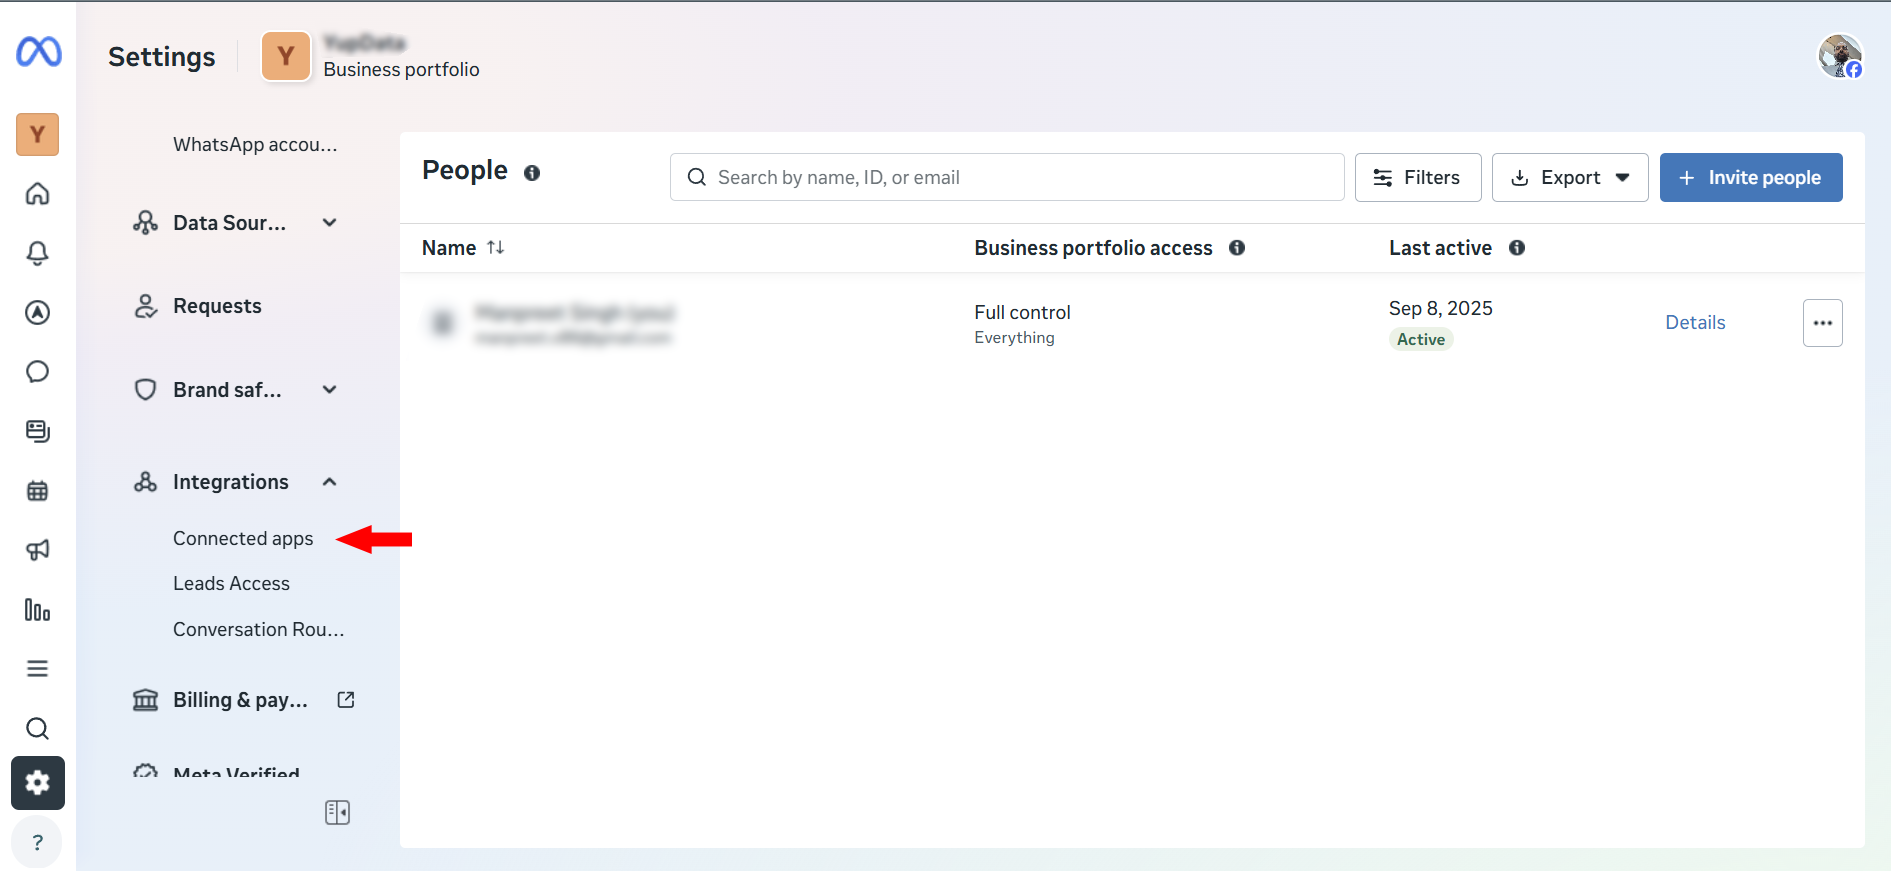
- Locate apCRM in the list of connected apps, select it, and remove it.

Google Ads
Signing Up for Google Ads
To sign up for the Google Ads module, click the Connect button and select the Google Ads button in the window that appears. Follow the instructions on the page to complete the signup process.
Removing Google Ads
Once you have signed up for the Google Ads module, you cannot delete it directly from the connections page due to several restrictions. Please contact your account manager if you wish to remove this subscription. Note that this subscription cannot be removed if there are any pending invoices.
Business Name
Your Business Name, also known as your 'Doing Business As' (DBA) name, is the public identity of your business used for branding and marketing purposes. This name will be used for promotions, so make sure it is correct. Most promotional tools do not allow business names longer than 25 characters, so ensure the length does not exceed this limit.
Assign Leads To
When a lead is generated through Google Ad, it will automatically be assigned to the selected user. The assigned user must respond to leads instantly to ensure timely follow-up.
Google Lead Form
The Google Lead Form is part of the Google Ads subscription. When a visitor clicks on a promotion displayed in the Google network, a lead form appears to capture their information, including their name, phone number, and email address. After submitting the form, users are redirected to the designated product URL, enabling them to explore your offerings in more detail.
Leads captured through the lead form are automatically displayed on the Leads page in the CRM, allowing you to manage and follow up with potential customers efficiently.
Attention!
- A Google Lead Form cannot be created until your Google Ads account is verified.
- A lead form cannot be deleted by the user itself. If you no longer need a lead form, please contact your account manager for assistance.
What if the system fails to create a lead automatically?
Rest assured, no lead will be lost. In the event the system encounters an issue while creating an automated lead, it will send the lead details and the error code to all active users via email. If you receive such an email, please forward the error code to your account manager immediately for further assistance. The email will also contain all lead information, so that you can manually create the lead if needed.
Note: This lead form should not be confused with the lead form on the Public Facing Website. Refer to this link to learn more about the lead form on the Public Facing Website.
Connecting to IndiaMART
We provide a dedicated WebHook to fetch leads from your IndiaMART account in real-time. To obtain your exclusive WebHook URL, follow the steps outlined in the IndiaMART Setup section. You can access IndiaMART setup page by visiting Marketing -> Integrations and clicking on the Connect button.
How Does It Work?
- Once the setup is complete, any lead received in IndiaMART is automatically added to the CRM.
- All users receive instant alerts within the portal and software notifications to ensure timely follow-ups.
Note: Currently, we do not support creating advertisements in your IndiaMART account. However, this feature will be available in the future once IndiaMART enables this functionality.
IndiaMART Setup
The IndiaMART Setup page generates an exclusive WebHook URL specifically for your account. This WebHook is used by IndiaMART to push leads into the CRM in real-time, ensuring seamless integration and immediate lead synchronization. To setup web hook, navigate to Integrations and then click on Connect button. This opens a side window. Click on IndiaMART icon to start setup.
Automatically Assigning Leads to a User
When a lead is automatically added to the system, it must be assigned to a user to ensure timely follow-up. Use the Select User input to assign the lead to a specific user who will manage it efficiently, preventing it from being overlooked.
Note: While the lead is assigned to the selected user, a new lead alert will still be sent to all users in the system.
Web Hook
Once you click the Submit button after selecting a user, the system generates a unique Webhook URL for your account. Follow the steps below to configure automated lead integration in your IndiaMART account. Please note, this option is only available for paid IndiaMART users:
- Log in to your IndiaMART account and navigate to the Lead Manager section.
- In the Lead Manager, click or hover over Import/Export Leads and select Push API.
- This will redirect you to the Push API Integration page. In this page:
- Select Other from the Select Source dropdown list.
- The Web Hook Listener window will appear.
- Configure Web Hook Listener in the Web Hook Listener window:
- In the first input box, enter the name of the software for your reference.
- Paste the URL generated by the CRM integration into the Web Hook Listener URL input box.
- Click on the Save Details button. IndiaMART will send an OTP to your registered mobile number to activate the API.
- Verify and Test: After saving, the Webhook URL will appear on the main page. To test the API, click on the Test your Webhook Listener URL button.
How to Disconnect?: To disconnect from IndiaMART, click on Deactivate API button on the same page. This will halt pushing leads into the CRM.
IndiaMART FAQ
Q1: How are IndiaMART leads received in the software?
When a lead is generated on IndiaMART, it is instantly pulled into the software through a webhook and assigned to the designated user set in your IndiaMART connection settings.
Q2: How can I change the user to whom IndiaMART leads are assigned?
- Go to the Integrations module.
- Click the gear icon on the IndiaMART connection card.
- Select a new user from the dropdown and save your changes.
Q3: Where can I find the IndiaMART Webhook URL?
- Click the gear icon on the IndiaMART card in the Integrations module.
- The Webhook URL will be displayed at the top of the settings panel.
- Use this URL to configure lead delivery in your IndiaMART account.
Connecting to Business Profile
Connecting your Google Business Profile is what lets Dealersip show your Google reviews, reply to them, and generate your review link. It is a one-time setup.
Before you start
- Your business must already be on Google. If it is not, create your Google Business Profile at business.google.com, get it verified, and come back afterwards.
- You must be an owner or a manager of that profile. Google only offers a business to accounts holding one of those roles, so a staff member’s personal Google account, or one never added to the profile, arrives at an empty business list. The People and access section of your Google Business Profile shows who holds which role.
- Sign in to your browser with that Google account first, so you are not switching accounts halfway through.
Steps to Connect
- Go to Marketing → Integrations. Everything already connected is shown here as a card.
- Click the + Connect tile. A panel titled Add Connection slides in from the right.
- Click Google Business Profile in that panel. Services already connected are greyed out there and marked Already Connected.
- You are taken to Google — sign in and allow the access Google asks for.
- Google returns you to the software, on the Business Profile & Location setup page.
- Choose your Business Profile, then your Business Location. The location list stays disabled, reading Select Business Account First, until a profile is chosen.
- Click Connect. Both fields become read-only and show Status: Connected.
The app asking permission on Google is called apCRM. Google’s permission screen does not say "Dealersip" — it shows apCRM, with an orange ring logo cut with a green leaf at the top. apCRM belongs to Oroo, the parent company, and it is the app that reads and answers your reviews on your behalf. This is expected.
One profile and one location. The software manages a single Google Business Profile and a single business location. A dealership with more than one location connects the one whose reviews it wants to work with.
Troubleshooting
- Your business location is not listed. You are signed in with the wrong Google account, that account is not an owner or manager of the profile, or the business is not yet listed on Google Maps.
- Google says you connected before. If the message It looks like you previously connected your Google Business account... appears, that account has already granted access once and Google did not issue a fresh permission. Open Manage your Google Account → Security → Your connections to third-party apps and services (myaccount.google.com/connections), find apCRM, remove its access, and connect again.
- Google refused outright. Google did not give access to your Business Profile. Please try again.
- Changing or removing what you connected — see Google Business Profile FAQ.
What connecting switches on
- Your reviews start arriving under Marketing → Social Inbox, on the Google Reviews tab, refreshed every two hours, where you can reply to them and choose which appear on your website.
- Your unique Google review link and its QR code become available on that tab.
- Sales start sending a feedback request email asking the buyer for a Google review — see Sending Feedback Request to Customer.
Disconnecting stops all three: no new reviews arrive, replies can no longer be posted to Google, and feedback requests stop going out. The reviews already collected stay in your Social Inbox.
Google Business Profile FAQ
Q1: I selected the wrong business location. How can I change it?
If you selected the wrong business account or location during setup, follow these steps:
- Go to the Integrations module.
- Click the gear icon on the Google Business Profile card.
- This will open the Google Business Profile setup page.
- Inputs on this page will be disabled to prevent accidental changes.
- To reset the selected business account and location, click the Delete link located at the bottom-left of the setup card.
Q2: Will deleting the business account disconnect my Google connection?
No, deleting the business account and location will not disconnect your Google account. It only removes the selected business data from the system so you can choose again.
Q3: How do I re-select the correct business account or location?
- After deletion, you will be redirected back to the main Integrations page.
- Click the gear icon again on the Google Business Profile card.
- The setup page will open with all inputs enabled.
- You can now select the correct business account and location.
- Since you’re already connected to Google, it will not prompt for reconnection.
Q4: How do I permanently disconnect or delete the Google Business account connection?
To permanently remove the Google Business Profile integration and clear the connection from the system, click the Delete icon on the Google Business Profile connection card in the Integrations module.
Web Offers – Automated Intent-Based Offers for Your Auto Dealership Website
Web Offers (also referred to as Web Promos) in Dealersip allow you to create automated, behavior-driven offers that appear on your car dealership website based on visitor intent. Unlike traditional website promotions that display the same message to every visitor, Web Offers are intelligent and dynamic. They are triggered by real-time visitor activity tracking and intent scoring.
This feature is designed to convert anonymous website visitors into qualified leads by presenting the right offer at the right moment in the buying journey.
Overview
Web Offers are automated website offers that respond to visitor behavior. They can be configured to appear across the entire dealership website or only on specific Vehicle Detail Pages (VDP). An offer may apply to all vehicles or to selected vehicles only. You can also enable unique coupon generation to increase urgency and improve conversion rates.
A web offer can be include unique coupons for every visitor. Unique coupons allow dealership to track traffic that is coming from the website. For global offers same coupon is displayed to all visitors. Offers that are based on buying intent include unique coupon code for every high intent visitor on your website.
Web Offers integrate directly with the Dealersip CRM and visitor tracking system, ensuring that offer delivery is based on real engagement rather than random display.
How Web Offers Work
When a visitor arrives on your auto dealership website, Dealersip begins tracking behavioral signals such as page views, time spent on pages, scroll depth, number of sessions, vehicle interest, and contact interactions. Based on these signals, an AI-driven heat score and intent level are calculated.
Once a visitor reaches the configured intent level for an offer, Dealersip automatically checks for an eligible Web Offer. If a valid and active offer matches the visitor’s intent and vehicle context, it is displayed.
This ensures that offers are shown strategically rather than randomly, improving both user experience and lead quality.
Offer Types
Web Offers can be configured under two page scopes.
Global Offers appear across your entire dealership website, including the home page, vehicle search results, and Vehicle Detail Pages. These are ideal for dealership-wide campaigns, trust-based incentives, or general promotional messaging such as free RC verification, Free Service For The First Year, or Extended Warranty etc.
Vehicle Detail Page Only (V) offers appear exclusively on vehicle detail pages. These offers may apply to all vehicles if no specific vehicles are selected, or they may apply only to selected vehicles. Vehicle-specific offers are particularly effective for clearing aging inventory, promoting high-margin vehicles, or running limited-time discounts on targeted stock. VDP offers are displayed in two formats. As soon as buying intent reaches the offer trigger level, a banner is displayed in a popup window to seek attention. When website visitor closes that banner then a small non-intrusive and non-distractive banner is displayed right above the lead form.
Intent Trigger Levels
Dealersip calculates buying-intent-level for every visitor on your automotive dealership website. Each Web Offer is configured with a minimum buying intent level. The offer will only display once the visitor’s behavior meets or exceeds this level.
The available intent levels are:
- Level 1 – Very Low Purchase Intent
- Level 2 – Low Purchase Intent
- Level 3 – Moderate Purchase Intent
- Level 4 – Strong Purchase Intent
- Level 5 – Extreme Intent (Purchase Ready)
For example, an offer without coupon may be set to trigger at Moderate Intent (Level 3), while an exclusive vehicle coupon may be configured to trigger only at Strong or Extreme Intent (Level 4 or 5). This prevents aggressive offers from appearing too early in the visitor journey.
Integrating Web Offers with Your Auto Dealership Website
By default web promos are auto integrated to your auto dealership website. Dealersip automatically chooses the best place to display offers. However you can contact your developer to customize it to any level.
- Your developer can place promo banners anywhere in the website as you like. But we recommend to keep promo banners to place at the default place chosen by the Dealersip.
- You can ask your developer to make the offer as fancy as you want. But we still recommend to keep the promo banner as simple as it can be. Too fancy banners with heavy animations feels intrusive and distracts the visitor mood. So, to main the trust of the website visitor in you, banners should be simple and non-intrusive.
- If you don't know who your developer is, then you can always contact your account manager.
Offer Display Logic
Dealersip automatically manages how offers are displayed to prevent overlap or confusion. At any given time, a maximum of one All Pages offer and one Vehicle Detail Page offer can be displayed. If multiple VDP offers are eligible, vehicle-specific offers take priority over general VDP offers. All offers respect their configured active status and time window based on the dealership’s time zone. This logic ensures a clean and professional presentation on your dealership website.
Best Practices
For optimal results, use All Pages offers to reinforce trust and dealership-wide benefits. Use Vehicle Detail Page offers for high-intent visitors who are actively evaluating a specific vehicle. Avoid triggering aggressive discount messaging at low intent levels. Keep offer messaging concise, value-focused, and conversion-oriented. Monitor performance using Dealersip CRM analytics to refine your strategy.
SEO and Conversion Impact
When used correctly, Web Offers can significantly improve lead generation, vehicle inquiry conversion, test drive bookings, and overall customer engagement on your auto dealership website. Because offers are intent-driven, they enhance user experience rather than interrupt it.
Important Notes
Offers are displayed only when visitor intent meets the configured trigger level. A popup offer will not repeatedly appear during the same session once it has been shown. Inactive or expired offers are automatically excluded. All time validation is calculated using the dealership’s configured time zone.
Creating a Web Offer
To create a Web Offer navigate to Marketing section in the navigation side bar and click on the Web Offers link. This will open the Web Offers page. To create new web offer, click on the "Add New" button at the top right side on the header bar. If you are unable to find the link then you can always ask Bella, it will give you the direct link.
Offer Scope
The Offer Scope setting determines where and how an offer is presented to your website visitors. When set to For Bella Chat Agent Only, the offer will not be visible anywhere on your website. It will be exclusively controlled by Bella AI, which decides when to present the offer during a conversation based on user intent and context. This is useful for personalized, conversational selling. When set to Website and Bella Chat Agent, the offer becomes available to both systems. In this case, your website’s intent tracking can display the offer directly on relevant pages, and Bella AI can also present the same offer during chat interactions. This ensures maximum visibility and increases the chances of conversion through both passive browsing and active conversation.
Offer Name
Offer Name is your internal identifier for the Web Offer inside Dealersip. This name is not displayed on your auto dealership website and is used only for management, reporting, and tracking purposes within the system.
You may enter any descriptive name that helps you easily recognize the purpose of the offer. For example, you may name it “February Clearance Campaign,” “High Margin SUV Push,” or “RC Verification Promo – Q1.”
Choose a clear and meaningful name so that when reviewing analytics, modifying offers, or managing multiple active campaigns, you can quickly identify the correct Web Offer.
Active
Active: This dropdown allows you to control whether the Website Offer is currently live on your dealership website.
If you select No, the offer is deactivated and will stop being shown to new visitors. Please note that deactivation is not immediate for users who are already browsing your website. The offer may continue to appear for existing sessions and will fully stop showing once visitors return after approximately 25 to 30 minutes.
All Website Offers are automatically deactivated once their configured end date has expired. No manual action is required after the expiry period.
Page Scope
Page Scope: This is a critical setting that defines the type of Web Offer you are creating and where it will appear on your dealership website.
1. Global (All Pages): If you choose this option, the offer will be displayed throughout your auto dealership website. This includes the home page, inventory pages, search results, and vehicle detail pages. The exact placement depends on how your website developer has configured banner areas. If no custom placement is defined, Dealersip automatically displays the offer in the most suitable and conversion-friendly positions.
Please note that Global offers are not intent-based. They are shown consistently across the website regardless of visitor behavior or intent level.
2. Vehicle Detail Page Only (VDP): If you select this option, the offer will appear only on vehicle detail pages. VDP offer is intent based i.e. it is triggered as soon as buyer reaches the selected intent level. For this selection following additional configuration options will become available:
a. When to Show
b. Setting for Sold Vehicles
c. Apply To Selected Vehicles Only
Each of these options is explained in detail in the following sections of this document.
Overlapping Offers
Dealersip does not allow two active offers at the same time. If you create an offer where date range overlaps previous offer then Dealersip automatically chose the most suitable offer for your website. Similarly for VDP Website Offers, if a vehicle is part of more than one offers then it will automatically be removed from older active offers.
When To Show
When to Show defines the visitor intent level at which your Web Offer is triggered. Dealersip continuously analyzes visitor behavior such as vehicle views, scroll depth, session activity, and contact interactions to determine purchase intent. Based on this level, your offer is displayed automatically.
1. Always
The offer is displayed to all visitors regardless of intent level. This option is best used for general dealership-wide messages, trust badges, seasonal promotions, or informational incentives that you want every visitor to see.
2. Low Purchase Intent
The offer is shown when the visitor demonstrates early buying signals. This level is useful for encouraging engagement from casual browsers who may still be comparing vehicles. A soft incentive such as “Free Vehicle History Report” or “Instant Price Breakdown” can help move them deeper into the sales funnel.
3. Moderate Purchase Intent
The offer is displayed when the visitor shows consistent engagement, such as multiple page views, repeat visits, or interaction with vehicle details. At this stage, the visitor is actively evaluating options. Offers like “Book a Free Test Drive” or “Unlock Special Financing Options” work well here.
4. Strong Purchase Intent
The offer is triggered when the visitor shows clear buying signals, such as returning multiple times, viewing specific vehicles repeatedly, or interacting with contact buttons. This is an ideal stage for limited-time discounts, trade-in bonuses, or dealership-exclusive offers designed to convert serious prospects.
5. Extreme Purchase Intent
The offer is shown when the visitor appears purchase-ready. Signals may include high heat score, repeated sessions within 24 hours, or contact actions like WhatsApp, phone, or email interaction. This level is best suited for high-conversion offers such as exclusive coupons, limited inventory alerts, or urgent closing incentives.
Choosing the correct trigger level ensures that your dealership website presents the right message at the right time without overwhelming visitors too early in their buying journey.
Setting for Sold Vehicles
Setting for Sold Vehicle allows you to control whether a Vehicle Detail Page (VDP) offer should appear when a vehicle is marked as sold or out of stock on your dealership website.
This dropdown includes the following options:
1. Do Not Show if Vehicle Is Sold
If selected, the offer will not appear once the vehicle is marked as sold or unavailable. This option is recommended when your offer is directly tied to that specific vehicle, such as a price discount, bonus accessory package, or limited-time incentive. It prevents confusion and ensures visitors are not encouraged to inquire about inventory that is no longer available.
2. Show Even if Vehicle Is Sold
If selected, the offer will still appear on the Vehicle Detail Page even after the vehicle is marked as sold. This strategy can be used intentionally to capture high-intent traffic. For example, you may display an offer such as “Missed This One? Get Notified About Similar Vehicles” or “Reserve the Next Incoming Unit.” This approach helps convert disappointment into opportunity and keeps visitors engaged within your dealership sales funnel.
The correct selection depends on your dealership’s marketing strategy. If your goal is strict inventory accuracy, choose not to show the offer. If your goal is lead capture and retention, even after a vehicle is sold, allowing the offer to remain visible can help generate alternative sales opportunities.
Offer Start and End Date
Offer Start Date: This field defines the date and time when your Web Offer becomes active on your auto dealership website. The offer will not be visible to visitors before this scheduled start time, even if it is marked as Active. Use this option to plan upcoming promotions, limited-time discounts, or scheduled campaigns in advance.
Offer End Date: This field defines when the Web Offer stops being eligible for display. Once the end date and time are reached, the system automatically treats the offer as expired and it will no longer be shown to website visitors.
Important: Expired offers are automatically deactivated by the system. You do not need to manually turn them off. However, visitors who are already on your dealership website may continue to see the offer briefly due to session timing. The offer will stop appearing for new or returning visitors after the session refresh window.
All date validations are based on your dealership’s configured time zone to ensure accurate scheduling and campaign control.
Coupon
Dealersip allows you to attach a coupon to your Website Offer in order to increase engagement and encourage action. Coupons can create urgency, improve lead conversion, and help your dealership track offer performance more effectively. Moreover, you can also track customers coming from your website to your dealership.
The behavior of the coupon depends on the Page Scope selected in the offer settings.
Global (All Pages) Offers:
For Global offers, a single coupon code is displayed to all eligible visitors. Every visitor who sees the offer will see the same coupon code.
Vehicle Detail Page (VDP) Offers:
For VDP offers, Dealersip can generate a unique coupon code for each visitor who reaches the configured intent trigger level. This creates a personalized experience and allows better tracking of high-intent visitors.
Coupon Dropdown Options
1. Use Unique Coupon Per Visitor:
If selected, Dealersip generates a unique coupon code automatically. For Global offers, the same code is displayed to all visitors. For VDP offers, each qualified visitor receives a different coupon code once they reach the required intent level.
2. Do Not Use Coupon:
If selected, no coupon code will be displayed with the offer. The banner will show only the headline, message, and call-to-action (if configured).
Coupons are designed to create measurable conversion opportunities and should be used strategically for high-intent visitors on your auto dealership website.
Apply To Selected Vehicles Only
This option allows you to control whether the Web Offer applies to specific vehicles or to your entire inventory.
You may select one or multiple vehicles from the list. If one or more vehicles are selected, the offer will be shown only on those selected Vehicle Detail Pages (VDP).
If no vehicle is selected, the offer automatically applies to all vehicles in your inventory. In this case, the system treats the offer as applicable to every vehicle page.
This feature is particularly useful when:
• Promoting aging inventory
• Highlighting high-margin vehicles
• Running limited-time offers on specific stock units
• Testing performance on selected models
Please note that Dealersip automatically handles offer prioritization if multiple offers exist. Vehicle-specific offers take precedence over general VDP offers for the same vehicle.
Using this setting correctly helps you run targeted, inventory-driven campaigns on your car dealership website while maintaining full control over promotional visibility.
Social Inbox
The Social Inbox gathers the messages your dealership receives from outside the software into one screen, so nothing sits unanswered in somebody’s personal inbox. Go to Marketing → Social Inbox. Across the top are three tabs, one for each channel.
The Refresh button at the top right belongs to the Google Reviews tab; it asks Google for the latest reviews.
Google Reviews needs your Google Business Profile connected before anything appears — see Connecting to Business Profile.
Not everyone in your dealership sees this screen. Administrators always have access; any other user must be given access to Social Inbox by an administrator under Admin → Users. That same list decides who is notified when a new review or enquiry arrives.