Integrations
The Integrations module allows you to manage third-party connections that enhance the functionality of your software, such as Facebook, Google Ads, Google Business Profile, and India Mart.
Integration Status Indicators
- Green icon: Integration is successfully connected.
- Red icon: Not connected.
- Orange icon: Connected, but requires additional setup steps.
Managing Integrations
- If a gear icon is visible on a card, you can click it to manage additional settings for that integration.
- Click the trash icon to remove an integration, if needed.
Adding a New Integration
- Click the + Connection button in the top-right corner.
- A side panel will appear showing all available integrations.
- Already connected integrations will be disabled and shown in gray.
- Select any available integration icon to begin the connection process.
- Follow the on-screen instructions to complete the integration.
Connecting with Facebook
To connect to Facebook, click the Connect button. Click on the Facebook icon, and you will be redirected to its official login page. Follow the on-screen instructions to complete the connection. In some cases Facebook may ask you to claim the page. This is normal. Just click on the Claim link.
Information We Store
Facebook uses a secure connection system. Upon successful connection, Facebook issues tokens that grant limited access, including an access-token, page-access-token, and your Facebook page ID. Only these three pieces of information are securely stored in our database. We do not retrieve or store any other details from your Facebook profile.
Disconnecting Facebook
Click  icon to remove the connection and all associated data from our system.
Troubleshooting Facebook Connectivity
Sometimes Dealersip users face problems connecting to Facebook. This usually happens when the user deletes the connection from the Integrations page inside Dealersip, but the apCRM app remains in the Connected Apps section in Meta Business Suite. To resolve this issue, you need to manually remove apCRM from Meta Business Suite.
Steps to Remove apCRM from Meta Business Suit
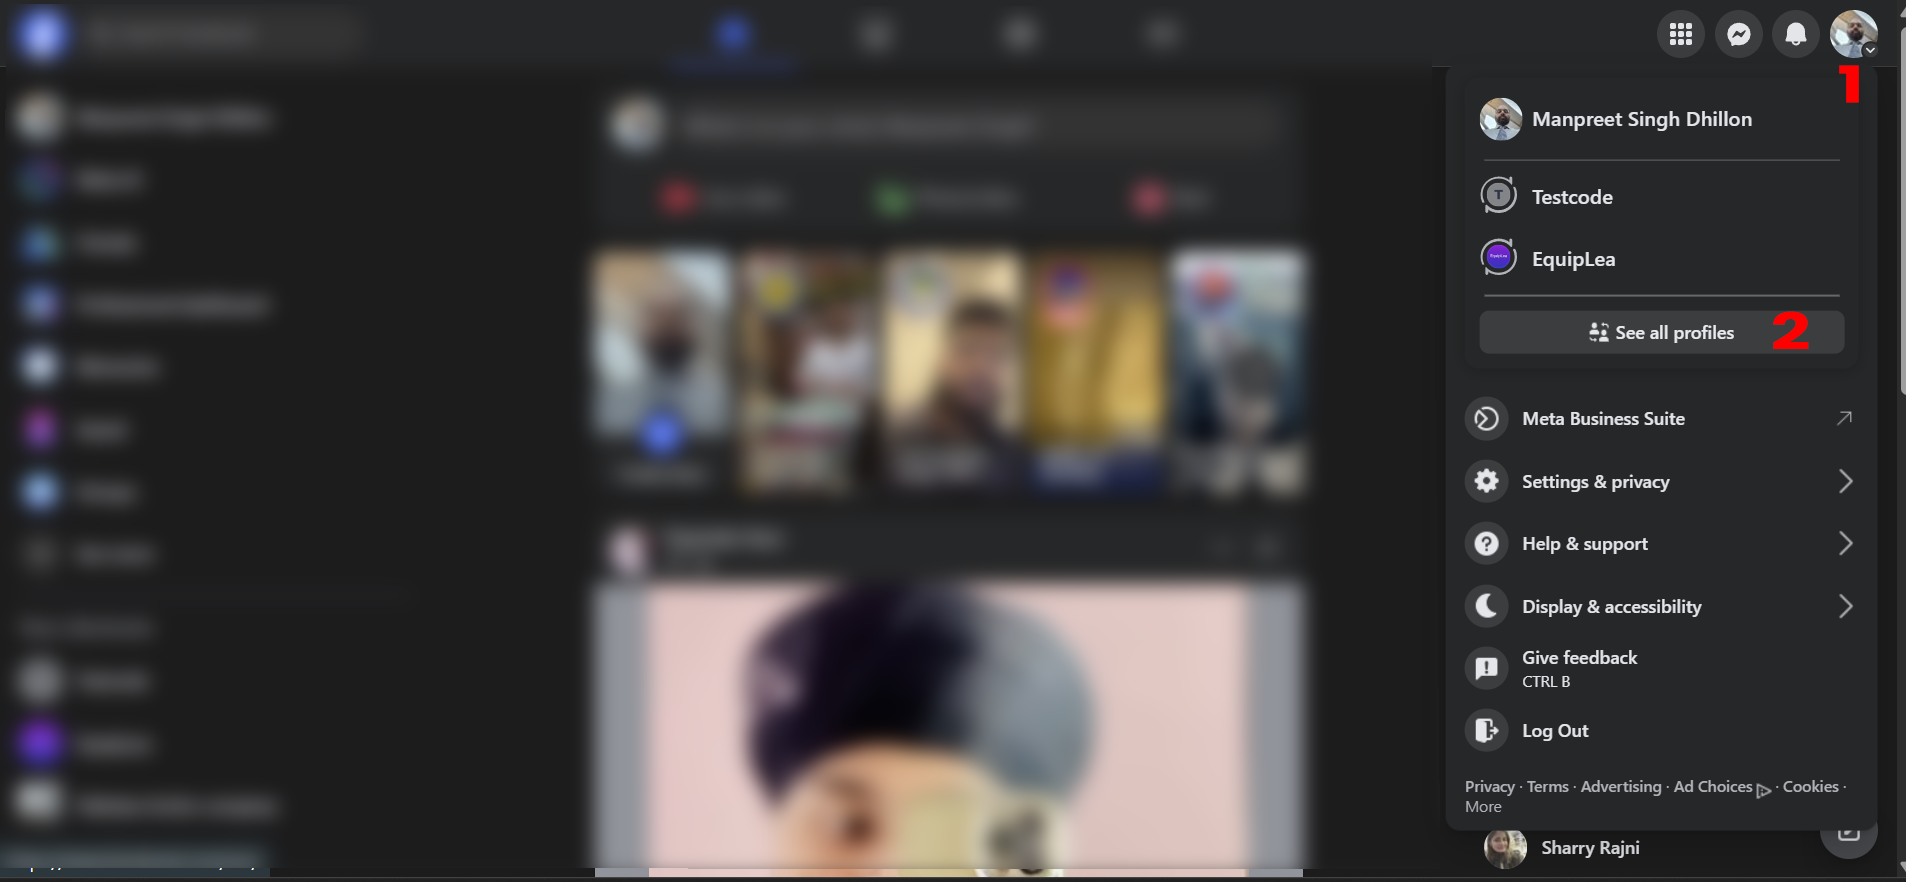
- Log in to your Facebook account and click on your profile icon in the top-right corner, marked as 1 in the image below. From the dropdown, select the business profile that you are using with apCRM of Dealersip. If you do not see the profile in the drop down then click on "See all Profiles", marked as 2 in the following image.
If you chose "See all Profiles", then you will see list of all available profiles as shown below:.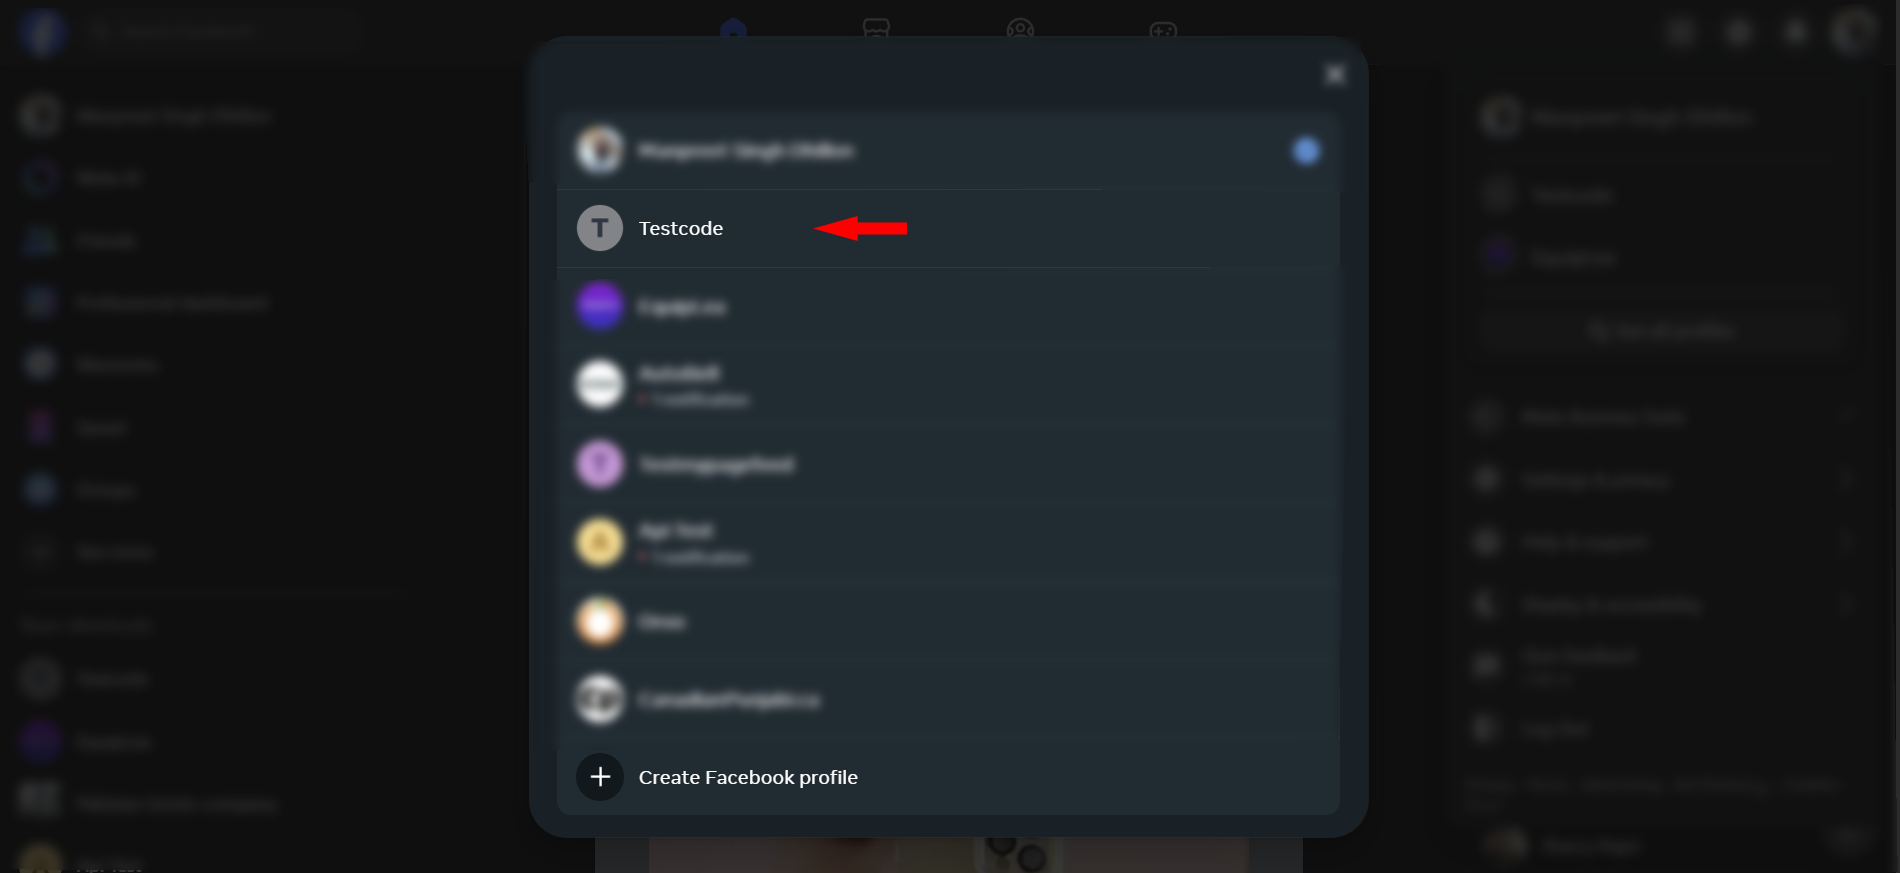
Choose the profile you are using with Dealersip-apCRM and continue with the next steps. - Once you are in the selected profile, in the left side menu, click See more to expand settings.

This will expand settings and will show more settings. Click on Meta Business Suite to open the business settings.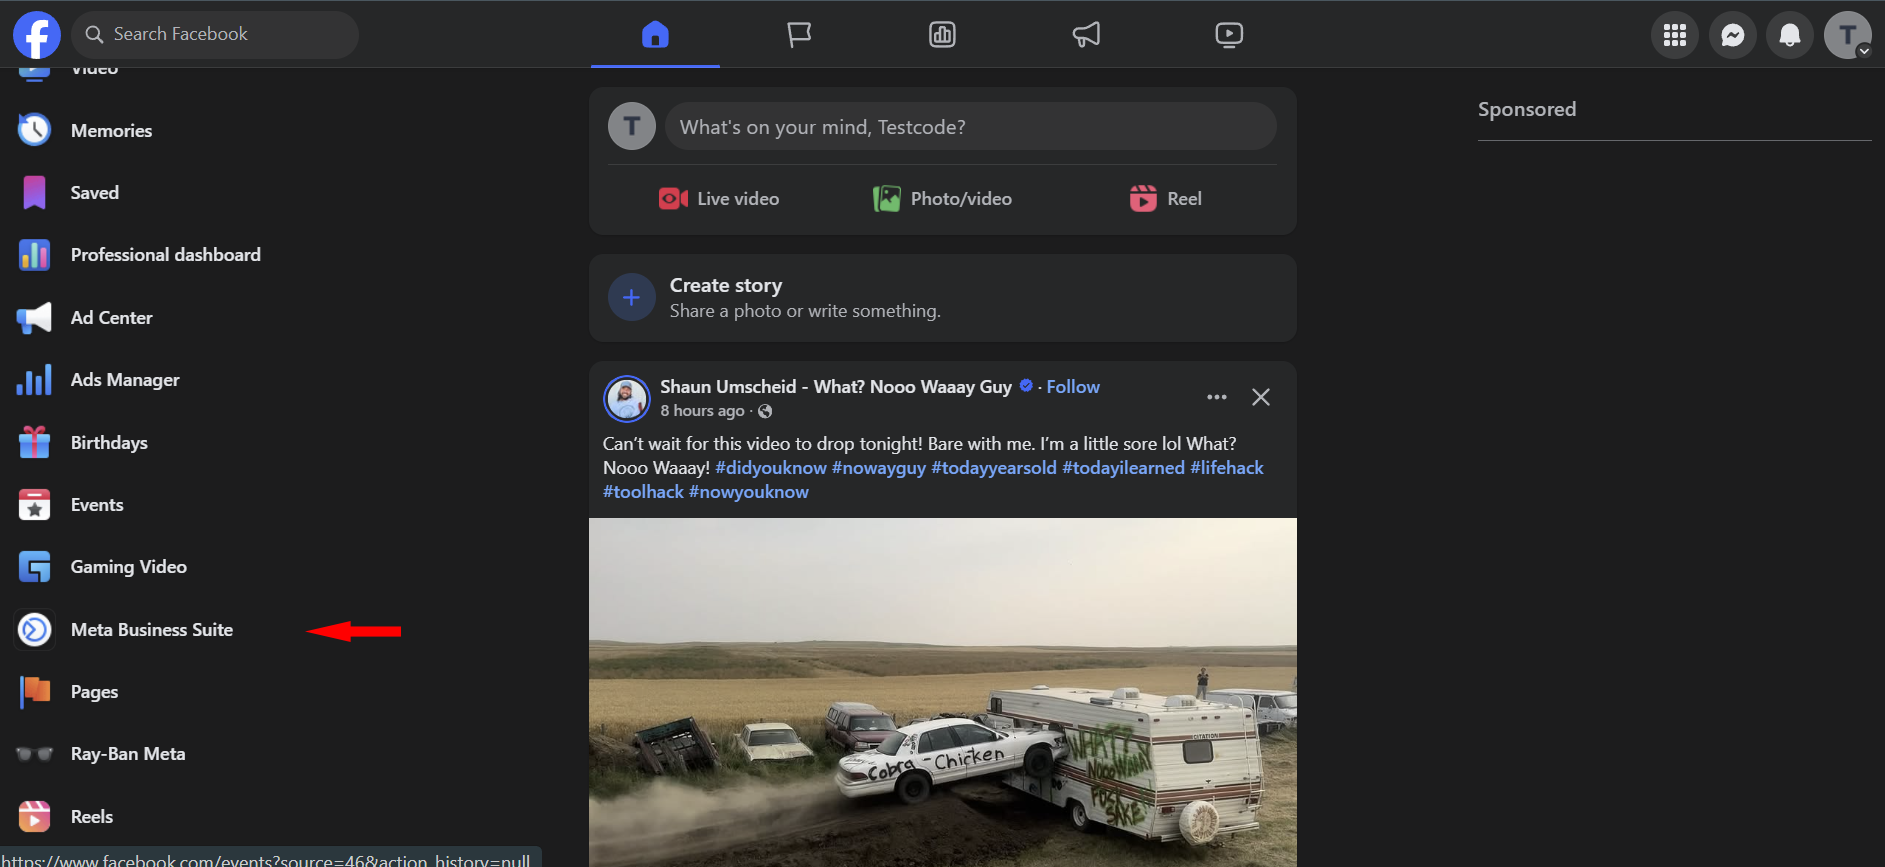
- In Meta Business Suite, go to the bottom left corner and click Settings.
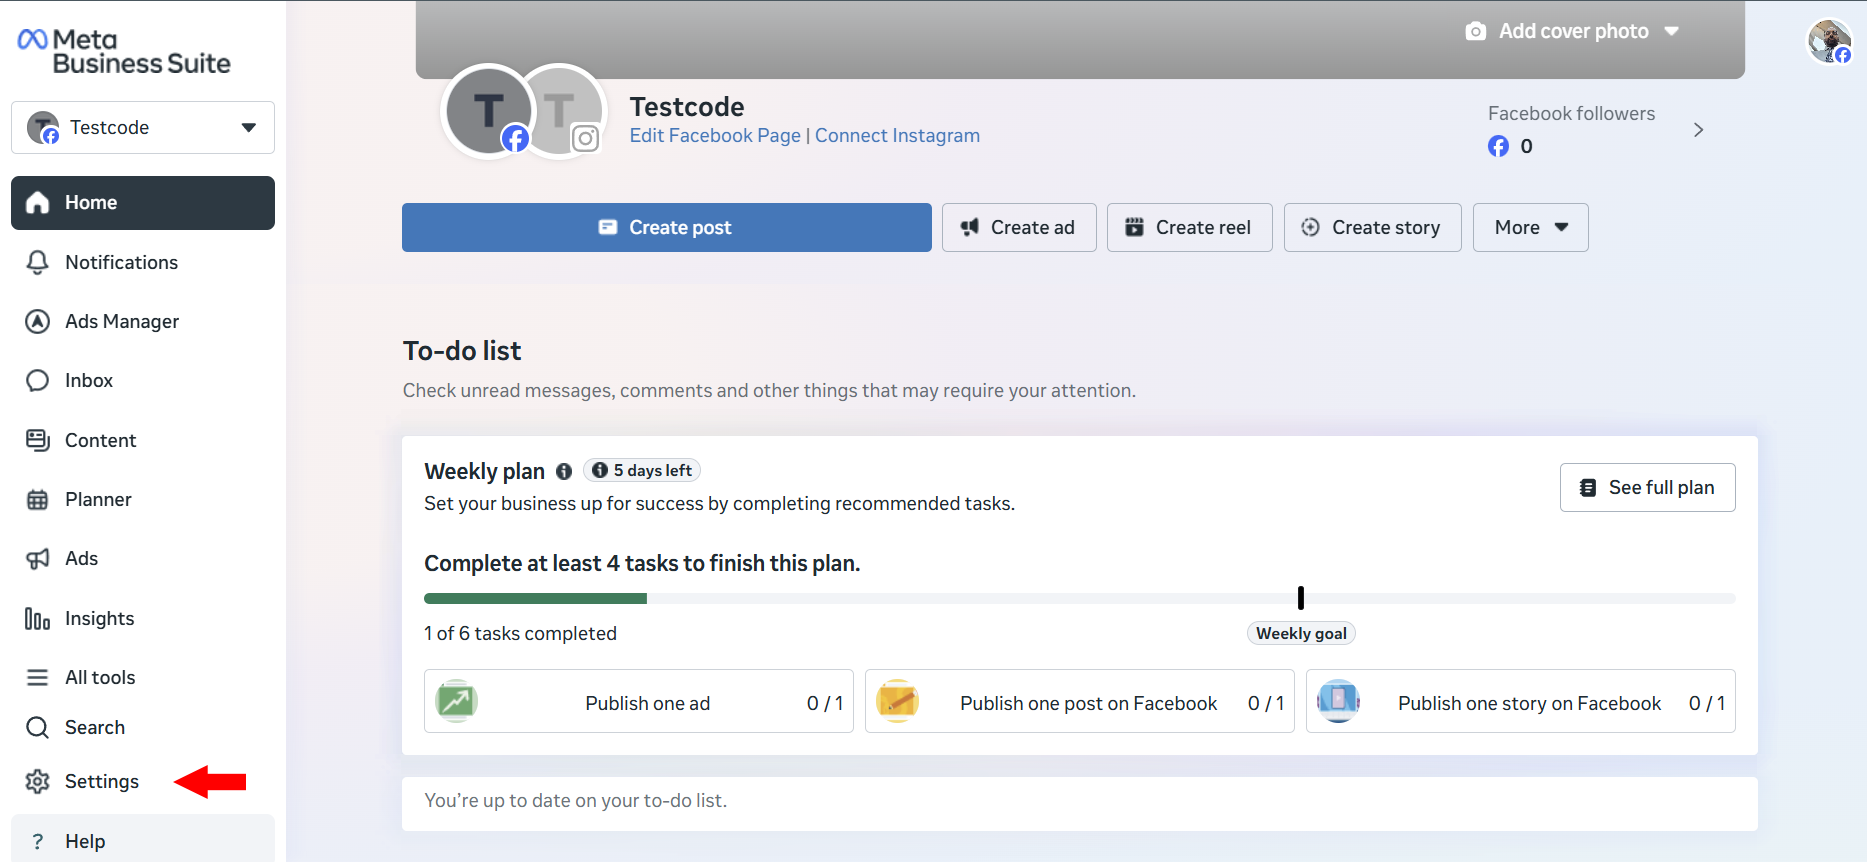
- In the settings panel, expand Integrations and then click on Connected Apps.
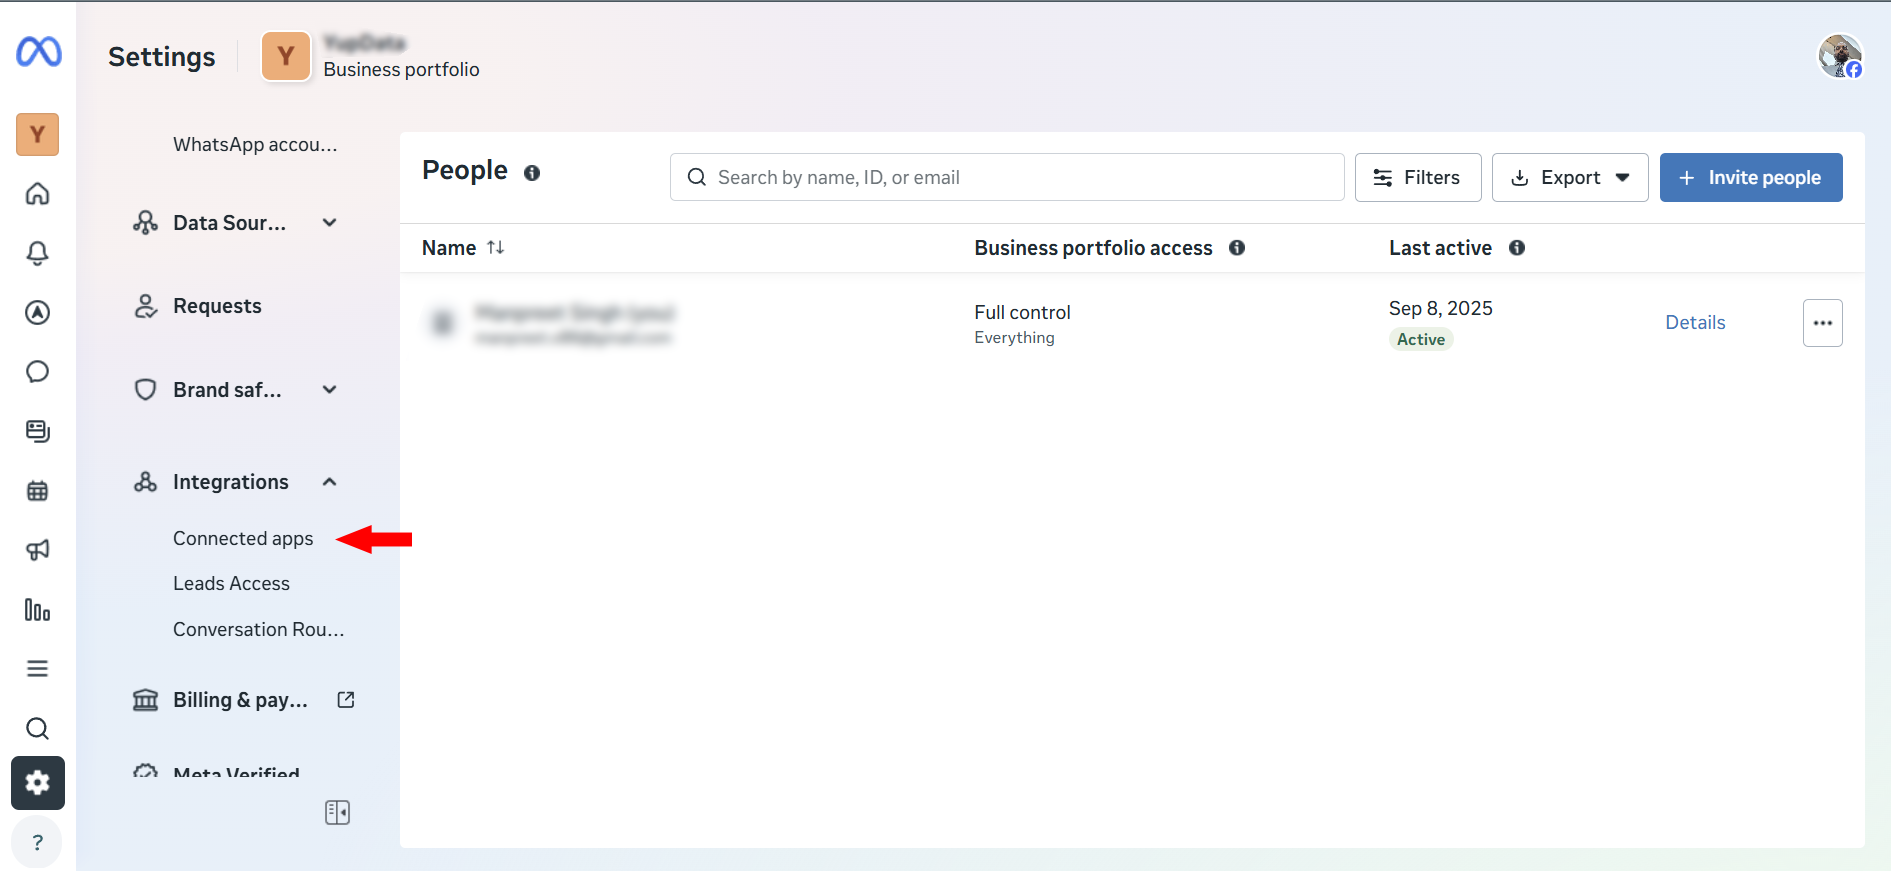
- Locate apCRM in the list of connected apps, select it, and remove it.

Google Ads
Signing Up for Google Ads
To sign up for the Google Ads module, click the Connect button and select the Google Ads button in the window that appears. Follow the instructions on the page to complete the signup process.
Removing Google Ads
Once you have signed up for the Google Ads module, you cannot delete it directly from the connections page due to several restrictions. Please contact your account manager if you wish to remove this subscription. Note that this subscription cannot be removed if there are any pending invoices.
Business Name
Your Business Name, also known as your 'Doing Business As' (DBA) name, is the public identity of your business used for branding and marketing purposes. This name will be used for promotions, so make sure it is correct. Most promotional tools do not allow business names longer than 25 characters, so ensure the length does not exceed this limit.
Assign Leads To
When a lead is generated through Google Ad, it will automatically be assigned to the selected user. The assigned user must respond to leads instantly to ensure timely follow-up.
Google Lead Form
The Google Lead Form is part of the Google Ads subscription. When a visitor clicks on a promotion displayed in the Google network, a lead form appears to capture their information, including their name, phone number, and email address. After submitting the form, users are redirected to the designated product URL, enabling them to explore your offerings in more detail.
Leads captured through the lead form are automatically displayed on the Leads page in the CRM, allowing you to manage and follow up with potential customers efficiently.
Attention!
- A Google Lead Form cannot be created until your Google Ads account is verified.
- A lead form cannot be deleted by the user itself. If you no longer need a lead form, please contact your account manager for assistance.
What if the system fails to create a lead automatically?
Rest assured, no lead will be lost. In the event the system encounters an issue while creating an automated lead, it will send the lead details and the error code to all active users via email. If you receive such an email, please forward the error code to your account manager immediately for further assistance. The email will also contain all lead information, so that you can manually create the lead if needed.
Note: This lead form should not be confused with the lead form on the Public Facing Website. Refer to this link to learn more about the lead form on the Public Facing Website.
Connecting to IndiaMART
We provide a dedicated WebHook to fetch leads from your IndiaMART account in real-time. To obtain your exclusive WebHook URL, follow the steps outlined in the IndiaMART Setup section. You can access IndiaMART setup page by visiting Marketing -> Integrations and clicking on the Connect button.
How Does It Work?
- Once the setup is complete, any lead received in IndiaMART is automatically added to the CRM.
- All users receive instant alerts within the portal and software notifications to ensure timely follow-ups.
Note: Currently, we do not support creating advertisements in your IndiaMART account. However, this feature will be available in the future once IndiaMART enables this functionality.
IndiaMART Setup
The IndiaMART Setup page generates an exclusive WebHook URL specifically for your account. This WebHook is used by IndiaMART to push leads into the CRM in real-time, ensuring seamless integration and immediate lead synchronization. To setup web hook, navigate to Integrations and then click on Connect button. This opens a side window. Click on IndiaMART icon to start setup.
Automatically Assigning Leads to a User
When a lead is automatically added to the system, it must be assigned to a user to ensure timely follow-up. Use the Select User input to assign the lead to a specific user who will manage it efficiently, preventing it from being overlooked.
Note: While the lead is assigned to the selected user, a new lead alert will still be sent to all users in the system.
Web Hook
Once you click the Submit button after selecting a user, the system generates a unique Webhook URL for your account. Follow the steps below to configure automated lead integration in your IndiaMART account. Please note, this option is only available for paid IndiaMART users:
- Log in to your IndiaMART account and navigate to the Lead Manager section.
- In the Lead Manager, click or hover over Import/Export Leads and select Push API.
- This will redirect you to the Push API Integration page. In this page:
- Select Other from the Select Source dropdown list.
- The Web Hook Listener window will appear.
- Configure Web Hook Listener in the Web Hook Listener window:
- In the first input box, enter the name of the software for your reference.
- Paste the URL generated by the CRM integration into the Web Hook Listener URL input box.
- Click on the Save Details button. IndiaMART will send an OTP to your registered mobile number to activate the API.
- Verify and Test: After saving, the Webhook URL will appear on the main page. To test the API, click on the Test your Webhook Listener URL button.
How to Disconnect?: To disconnect from IndiaMART, click on Deactivate API button on the same page. This will halt pushing leads into the CRM.
IndiaMART FAQ
Q1: How are IndiaMART leads received in the software?
When a lead is generated on IndiaMART, it is instantly pulled into the software through a webhook and assigned to the designated user set in your IndiaMART connection settings.
Q2: How can I change the user to whom IndiaMART leads are assigned?
- Go to the Integrations module.
- Click the gear icon on the IndiaMART connection card.
- Select a new user from the dropdown and save your changes.
Q3: Where can I find the IndiaMART Webhook URL?
- Click the gear icon on the IndiaMART card in the Integrations module.
- The Webhook URL will be displayed at the top of the settings panel.
- Use this URL to configure lead delivery in your IndiaMART account.
Connecting to Business Profile
Connecting your Google Business Profile is what lets Dealersip show your Google reviews, reply to them, and generate your review link. It is a one-time setup.
Before you start
- Your business must already be on Google. If it is not, create your Google Business Profile at business.google.com, get it verified, and come back afterwards.
- You must be an owner or a manager of that profile. Google only offers a business to accounts holding one of those roles, so a staff member’s personal Google account, or one never added to the profile, arrives at an empty business list. The People and access section of your Google Business Profile shows who holds which role.
- Sign in to your browser with that Google account first, so you are not switching accounts halfway through.
Steps to Connect
- Go to Marketing → Integrations. Everything already connected is shown here as a card.
- Click the + Connect tile. A panel titled Add Connection slides in from the right.
- Click Google Business Profile in that panel. Services already connected are greyed out there and marked Already Connected.
- You are taken to Google — sign in and allow the access Google asks for.
- Google returns you to the software, on the Business Profile & Location setup page.
- Choose your Business Profile, then your Business Location. The location list stays disabled, reading Select Business Account First, until a profile is chosen.
- Click Connect. Both fields become read-only and show Status: Connected.
The app asking permission on Google is called apCRM. Google’s permission screen does not say "Dealersip" — it shows apCRM, with an orange ring logo cut with a green leaf at the top. apCRM belongs to Oroo, the parent company, and it is the app that reads and answers your reviews on your behalf. This is expected.
One profile and one location. The software manages a single Google Business Profile and a single business location. A dealership with more than one location connects the one whose reviews it wants to work with.
Troubleshooting
- Your business location is not listed. You are signed in with the wrong Google account, that account is not an owner or manager of the profile, or the business is not yet listed on Google Maps.
- Google says you connected before. If the message It looks like you previously connected your Google Business account... appears, that account has already granted access once and Google did not issue a fresh permission. Open Manage your Google Account → Security → Your connections to third-party apps and services (myaccount.google.com/connections), find apCRM, remove its access, and connect again.
- Google refused outright. Google did not give access to your Business Profile. Please try again.
- Changing or removing what you connected — see Google Business Profile FAQ.
What connecting switches on
- Your reviews start arriving under Marketing → Social Inbox, on the Google Reviews tab, refreshed every two hours, where you can reply to them and choose which appear on your website.
- Your unique Google review link and its QR code become available on that tab.
- Sales start sending a feedback request email asking the buyer for a Google review — see Sending Feedback Request to Customer.
Disconnecting stops all three: no new reviews arrive, replies can no longer be posted to Google, and feedback requests stop going out. The reviews already collected stay in your Social Inbox.
Google Business Profile FAQ
Q1: I selected the wrong business location. How can I change it?
If you selected the wrong business account or location during setup, follow these steps:
- Go to the Integrations module.
- Click the gear icon on the Google Business Profile card.
- This will open the Google Business Profile setup page.
- Inputs on this page will be disabled to prevent accidental changes.
- To reset the selected business account and location, click the Delete link located at the bottom-left of the setup card.
Q2: Will deleting the business account disconnect my Google connection?
No, deleting the business account and location will not disconnect your Google account. It only removes the selected business data from the system so you can choose again.
Q3: How do I re-select the correct business account or location?
- After deletion, you will be redirected back to the main Integrations page.
- Click the gear icon again on the Google Business Profile card.
- The setup page will open with all inputs enabled.
- You can now select the correct business account and location.
- Since you’re already connected to Google, it will not prompt for reconnection.
Q4: How do I permanently disconnect or delete the Google Business account connection?
To permanently remove the Google Business Profile integration and clear the connection from the system, click the Delete icon on the Google Business Profile connection card in the Integrations module.